
Yesterday we pulled the last of the marigolds and the petunias and the last zucchini plant. Very shortly after we went indoors it began to snow. So we waited until the very last moment. I still have a nice crop of lettuce under a frost cover which should last awhile.
Earlier in the day, while it was still raining and sleeting and looking miserable we went to our favorite antique mall for a check-in. It is a very large mall but we can get through it pretty quickly and spot the new interesting items. We have been on the look out for a second Hoosier chimney cupboard to display my kitchen collectibles and graniteware. I have one that I bought on eBay and had shipped in some 10 or 12 years ago. The finish wasn't bad, but structurally it was shot and Tim had to rebuild it saving only the door, face frame and shelves. We have enjoyed it ever since.

At the antique mall Tim spotted a double door one that was a little later date and the paint was still good on it. I refused to consider it because we really don't have room for a double and the paint was good enough that I felt someone could enjoy it "as-is" and refinishing it wouldn't do it any favors.
Tim was a bit put out with my vehement veto, but a little while later I spotted just the right thing. "There. That is the perfect restoration candidate" Tim said he wasn't going to point it out because he thought I was in an un-receptive mood that day but I have to wait for something to speak to me. This cupboard said "Take me home and save me". We obliged. For the very reasonable price of $55 we loaded it in the back of the truck and headed home in the sleet.

This cabinet is from around 1930 and is structurally much better built than the knock off version we already restored. Hoosier cabinets were the affordable "K-Mart" furniture of the day made mostly from cheap Lauan plywood and maple but sometimes from beautiful oak. This one had served it's time in the kitchen and then was moved out into the garage. The shelves were lined with newspaper from the Buffalo Courier Express dated February 10, 1953. The man had spray painted parts of it then obviously ran out of paint and switched to some sort of shellac. Probably to help protect the wood from what he was about to do to it and I guess it worked.

Someone had in mind to fix it up because they had used an orbital sander on the outside and done a lot of the hard work. But then they gave up probably because it is just cheap plywood and not one of the more rare oak ones. When you are picking antiques and reselling them, you have to be careful not to "remove all the fun". People like us enjoy salvaging these things, but.....
Seriously?

All the seller would have had to done is scrape out some crap and removed the bottle of Mercurochrome and it would have been much more appealing. It would probably not have cost $55 either. We got the garbage can and a couple of putty knives and removed a layer of crud. It already looked better. And we confirmed that it was originally painted "French Grey" (light greenish color) just like my Hoosier. How appropriate.

Today we moved it into the shop and commenced restoration.
For as much ripping and tearing as Tim does with trees and stumps, he has a lot of patience with old things. Usually he tinkers with coin-op antiques but he is very good with wood too. He knows how to take things apart without ruining them. And, more important to this project, he knows how to put them back together.
We started with the back - you'll see why in a minute. We carefully slipped two putty knives between the Lauan and the frame and then Tim drove a nail puller between the knives safely driving a wedge and easing each nail out without tearing up the wood.

This was the most time consuming part but it will save a ton of time and trouble later on.

Because can you imagine trying to sand down this mess
while it was still INSIDE the cupboard?
Impossible.
And with the back removed, the nasty shelves slide right out for sanding.

Now a lot of people would have stopped there. But Tim is more than capable of putting this back together, so we kept going. We wedged the sides off of the face frame. The frame was face nailed with finish nails, so Tim uses a nipper to pull the nails on through from the back without damaging the front.

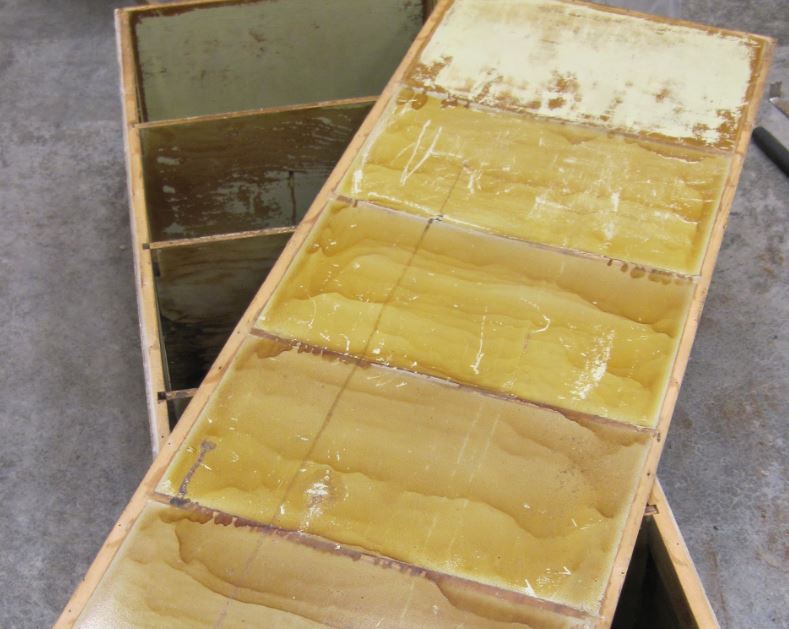
We ended up with a stack of panels, carefully labeled with tape

And I began to sand.

With all the pieces able to be laid flat and moved around, sanding and painting will be a breeze. I'm ordering new replacement hardware and picking up some paint to match what we already have.
Stay Tuned.
Another skill to be in awe of.
ReplyDelete1. One day we'll have gardens half as nice as yours. (Probably not)
2. One day we'll have a home decorated half as nicely as yours. (Probably not)
3. One day I will have the patience to dismantle, sand, refinish and paint/stain any piece of furniture. (Definitely not)
I think I'll go sit in the corner and quietly weep. :)
Jason
My father was capable of this type work. I have not met anyone since who is even interested in doing this type work. Does your husband have a father who is single or works cheap? LOL
ReplyDelete