Saturday, December 22, 2012

Seasons Greetings


May your gardening Season start early
 

Sunday, December 9, 2012

Oh Tannenbaum


For centuries, if not millennia, people have been bringing evergreen plants into their home to celebrate the winter Solstice and give them hope to get them through the bleakest darkest days of winter.  In the 1500s, the Germans and the Scandinavians began to bring in whole trees but the idea did not begin to catch on in America until the mid 1800s, and their presence has often caused controversy due to their pagan origins. 

I have not had a live tree for at least 10 years.  In fact, for the last four years we have not had a tree at all.  We no longer had an empty wall space to rotate furniture to and there simply wasn't room in this tiny, 900 square foot house to put one.  I've kept my eyes open for a good quality artificial table top tree, but so far, nothing has seemed right.

A Christmas tree is a rather personal thing. Each one has its own character and each decorator imparts some vestige of themselves in it. The very shape of an evergreen tree is attractive. So much so, that my sister, with her minimalist decorating style, has been known to put up her large prelit, and very realistic looking artificial tree, place a star on it, and call it done. Artificial trees are nice, but the live ones speak more to me. It's even better when you know the tree personally or associate good memories with choosing it and bringing it home.


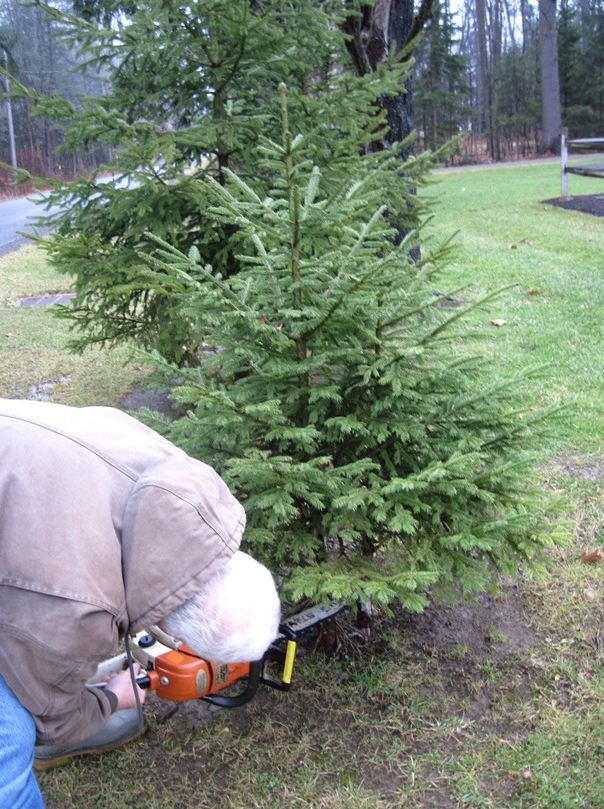
This little Hemlock, and it's Siamese twin have been growing on the shoulder of the road along our frontage.  I remember when it was just a twig.  Heck, I remember when it wasn't even there.  It popped up back when the area was wild and unkempt, battling it's way through a thick layer of leaves and weeds and somehow survived the placement of a culvert pipe along the ditch.  I have admired it every time I drove by it for a few years now, thinking what a perfect little tree it was and how nice it would look as a Christmas tree.  I almost cut it last year, but couldn't commit.  This past summer, as we were working along the fence line, Tim said "I'm going to get the tractor and pull out those little trees.  I'm tired of mowing around them."  No!  I want to use them for Christmas trees!  I promise this year I will.  And so the stay of execution.


These little trees were growing side by side, not 6 inches between them.  I had studied them well enough to know the bigger one was the right size and shape for what I wanted.  I wasn't sure about the smaller one.  They were too close together to separate and replant.  Their symmetry was in doubt .  Tim was excited to be rid of one or both so he offered to help.


I thought maybe the smaller one could be left to grow and be used in the future, but it was pretty dismal looking standing there alone.  We decided to cut that one too, and Mom could either use it for a table top tree or cut it up for wreaths.  A couple of weeks ago we cut a 30 foot Hemlock for Mom's wreaths, but the top was too misshapen to use as a Christmas tree.  Mom would be happy to get this little guy as a replacement.


Once freed from its family entanglements, my little tree was just as perfect as I had pictured it.


Polish Table Top Tree
For several years I have been collecting pictures of perfectly decorated table top trees.  The one above is decorated with handmade wheat and straw ornaments as well as painted blown out eggs.  More details can be read by clicking on the caption link.  I love themed trees but hand making all your own ornaments requires quite a head start on the season.  If you had more than one tree to decorate this would be a fun project and you could customise them to each room.

Tinsel Tree
Commercial ornaments can be used to good effect if you keep your color scheme in mind.  Note that all these table top trees are placed in urns and not tree stands.  Their little trunks are pretty difficult to fit into most stands.  An urn, or even a galvanised pail full of gravel make an excellent alternative and provide enough ballast to keep a tree upright.


Pruning a Table Top Tree
Another thing all these little table top trees have in common is that they are not the bushy full trees you get from a Christmas Tree Farm.  They also bear little resemblance to most artificial trees.  They do look like the natural growing Blue Spruce we cut every year from my Grandfather's farm.  The open layers of branches leave room for the ornaments to hang straight down so you can see and enjoy them.  Instructions for pruning a tree this way are linked in the caption above.  But, pruning more than half of the branches out was not something I was ever prepared to do with a tree I had paid good money for.  Even if the trimmings could be used for wreaths or centerpieces, it seemed like an expensive experiment.


Enter my little Hemlock.  In hind sight, there were probably a couple of branches that could have been trimmed out of this one, but it looks quite good as it is.  The trunk was just big enough to fit my cast iron tree stand (with a little shimming) and the tree stand's tiny reservoir is just adequate for this size tree. 

I really had no clear idea in mind for this tree.  I knew I didn't want to use red.  I also had gold balls so I started with those.  Actually, of course I started with the lights.  The accepted practice for placing lights on a "designer hoity toity tree" is to run them along the center of each branch, over the tip, and back to the trunk.  My little Hemlock was too fine and flexible for this so there is a good deal of floral tape in there holding the wire to the branches.  I added some green ornaments and glittery icicles as a base for my special ornaments.


I wanted this tree to represent the things that Tim and I enjoy.  There are a lot of gardening themed ornaments in there, including lots of tomatoes, some pea pods, eggplant, beet, garlic and even Wellie boots.  There is a grey Saddlebred horse, and a red 1954 Ford truck.  Tim's gas station collection is represented by a gas pump, and his gumball machines by a rather clever little 5 cent gumball machine.  They truly make an ornament for everything. 

The Breyer porcelain ornament represents my horse William

This marvelous little gumball machine is made by Kurt Adler Co.

 
It's hard to photograph a Christmas tree.  They almost always look better in person.  There is just something magical about staring into their depths no matter what your age.

Even this little tree is quite an imposing presence in the room.  I haven't even decorated the pie safe or Hoosier because I think it would detract from the tree.


Its hard to tell, but in person the gold ornaments really highlight the brass hardware on the Hoosier, and the green ones pick up on the cream and green graniteware I have collected.

Yes, this Christmas tree says a lot about Tim and I and it fits perfectly in our home.  It was born and raised here.  It has been admired and intended for this job for several years.  Tim and I had fun, in our own way, picking it out and bringing it in the house.  The ornaments have been carefully chosen individually for what they mean to us.  It has a lot of country charm, this little tree.  And the other little tree?  It didn't get cut up for wreaths.  It is sitting in a pail of gravel in my mother's picture window, and I'm sure it has been decorated just so.  It had a purpose as well.


Monday, November 26, 2012

Happy Thanksgiving

Vintage Eat Less and Be Thankful poster, image courtesy of US National Archives
I know this is late, but I saw this terrific vintage poster on a fellow blogger's posting and had to share.   I hope everyone had a good holiday weekend and managed to work some of their harvest into the meal.

We had both potatoes and sweet potatoes from the garden, sweet corn frozen from the local farm stand, and the weather was so beautiful Thursday morning that I went out and clipped fresh sage, rosemary and thyme to mix with my homegrown garlic for this terrific recipe.  It was outstanding.  Why did I never think to pour wine under the turkey before?  It kept it very moist. 

Thursday, October 11, 2012

Seed Catalogs Botanical Interests


A terrific little seed catalog came in the mail this week that contains only illustrations, no photos.  The artist is Marjorie Leggit and I just LOVE her work.  Recently I showed the picture below of the purple beans and stated that I did not remember which seed catalog it was from.  Well, I found it.
 

The purple beans are from the Vermont Bean Seed Catalog.  I have not been able to confirm who this artist is though. 


The Botanical Interests catalog is very through.  I will likely order at least a little something from them, and since the seed packets are also illustrated, I'll be putting them into my seed pack collection!
 

Sunday, October 7, 2012

The Mulch Bunker

Once upon a time there was a county bridge.  It was on a back road and little used, so it was built out of wood.  The deck was made from 20 foot long 2"x6" treated lumber nailed with their sides against each other forming a 6" thick deck.  The top of this was tarred and a layer of asphalt was laid on top.  It was a serviceable bridge, but there came a time for it to be replaced.  A thrifty Town highway worker asked Tim if he had any use for the material.  Tim's motto is Repurpose, Reuse, Redistribute, so he went and broke down that deck nail by twisted nail and hauled it home.  Now this took many hours and cost more than one splinter but when all was said and done there was about $1600 of useful lumber there.  These boards lived tucked away in the woods for several years until just the right purpose could be decided on.
In the mean time.  Around here, there are always piles of material.  With all our projects there is usually at least one pile of mulch, one of crushed bank run gravel, and a couple of piles of top dirt either freshly sifted or reclaimed from one of our changes in the landscaping plan.  Each time we have to figure out a place to put the pile and then give directions to our trusty excavator friend which usually go something like: "go down Mike's driveway and cut across to where you dumped the last load of _____ and try to get it there off the drive."  These spots have to be accessible to a very large truck, and quite frankly, we're running out of them.  So for a few years Tim has intended to build a series of bins or bunkers so all he will have to do is say "put it in #3" and he won't have to worry about the truck getting stuck or dumping in the wrong place or damaging some trees/road/lawn in the process.

The past few years we have been losing our ash trees.  Some of this, probably, can be attributed to the Emerald Ash Borer, but we haven't actually seen any tell tale signs of that insect.  But something is killing a lot of Ash in our area, and ours have not been immune to the die off.  So we are gaining a little extra space.  We needed an area for staging material, and a dozen dying trees that needed to go.  The process began early in July... these things take a lot of time.

The Ash Trees are Dying

Large Trees Removed

Pulling Stumps

Each Stump Leaves Quite a Hole

Driveway Outlines and Base Gravel Added

The Base Must be Compacted and Allowed to Settle

The First Posts Go In

The Dividing Wall Posts Go In

The Perimeter Walls Go Up
This is a three bay bunker.  Each area is 12'x12'.  Any horse people out there beginning to think that this guy would be really good at building a run-in shed?


The Dividing Walls Go Up

The Posts are Cut to Size and Finished
As you can see the 2x6s still have a lot of tar on them.  This has actually helped to preserve them.  And hey, its not that often you get a pile of fortysome twenty foot 2x6s for free!

A Load of Bank Run That Was in the Way Takes Up Residence

The Finished Product
There is still some finish work to be done.  There will be a threshold added along the front and the pea gravel for the drive will be added.  Then we have reclaimed concrete pavers to put down the center of each bay.  But first the snow load over the winter will help to settle and compact everything so Tim will finish that in the spring.  Then we will have a load of mulch delivered, and we will be all set to go cleaning up the landscape for another season.

Thursday, October 4, 2012

Beans: It's What's for Dinner

This was the cover of a seed catalog last year.
I don't recall which one, but the art is amazing.

 
Despite the fact that the garden has been cleared and put to bed for the winter, it is still possible to have too much of something.  I love beans.  I could eat them for every meal.  I have enough producing right now to do that.  By the time frost comes, Tim will be sick to death of them.  Truth be told, I think he already is....


And there are plenty more where that came from.


Monday, October 1, 2012

Putting the Beds to Bed


 It is October first, and the garden has been put to bed.  This is something that could be, and has been, done all in one day, but I prefer to spread it out over about two weeks.  There is a degree of mourning, a time for reflection and reminiscence, a tidying of affairs.  During this wind down I keep an eye on the weather and pick the last of crops as the temperatures and rain fall dictate.  I pull spent flowers instead of trimming them, and dump pots.  Most of the containers I used for potatoes and such are emptied into the beds to amend them with the peat moss and other additives that are leftover.  Pots, poles and tags are washed and stowed away.  Tim disappears into one shed or another and begins banging and thumping and complaining about how I have no concept of spatial relations. 


Toad Two of Three
 The toads, earthworms and bees don't see this time as a tidying of affairs.  From their viewpoint I am laying waste to their habitat and I go slowly so I don't accidentally injure anyone and to give them a head start towards relocating to higher ground.


There is always a little island leftover.  In the potato patch I have a Butterstick zucchini plant and two rows of beans still growing and producing.


It seems that the later I plant bush beans, the healthier the plants and the better the crop.  These were planted around the last week of July.  They will keep us (and probably a few other people) eating fresh garden produce until the first hard frost.  I already froze three gallons of beans so all of these can be eaten fresh or given away.

September is high season for zinnias and nasturtiums.  I regretfully pulled all the others but left this little cluster of sunshine near the gate to be enjoyed for a few more weeks.


The autumn colors are brilliant and early this year.  The meteorologists warned that the trees may drop their leaves early before they turn to full color because they have been stressed by the drought.  So far, the effect has been for early and stunning color.  The ash have mostly turned, and about half the maples are reaching peak color.  I would say we are two weeks ahead on color.


We are enjoying lush green grass, moderate temperatures, and autumn skies and views.  I have already had to clip my horse's coat to keep him cool on rides.  Any blog followers who would like to read a horse blog instead, can follow my horse's blog at The Grey Horse.


Just an update on the Poop Deck.  Instead of trying to manage the incorporation of new material into the pile on a daily basis, Tim came up with a solution for household and garden scraps.  He had this scrap of drainpipe leftover from a ditching project.  The inner walls are smooth, not corrugated like the outer wall.  He drilled air holes between each ridge at four points to provide airflow.  Let me tell you, this is a composting machine

We filled it nearly to the top every couple of days during the summer, and within a week, the level would have reduced by a couple of feet.  Periodically, we would throw a thin layer of material from the compost pile itself, and during dry periods we would use the hose to add water.  A few weeks ago we emptied it for the first time.   Tim used the tractor loader to dig a valley into the pile and we pulled the lightweight drainpipe up and off leaving the column of compost standing.  The compost at the bottom was completely broken down and ready to use.  We pushed the half cooked material over into the pile and covered it so it can continue cooking.  This drainpipe is perfect for the lazy composter! 

We used about half of this pile to amend the beds, potato patch and areas around the landscaping.  We are now off to the farm for another load that can compost through the winter.

Monday, September 17, 2012

Are we there yet?: Side Yard

Did you ever have one of those projects that seemed to never end?  Our furthest side yard has been a never ending project.  I remember, 12 years ago when I first met Tim, it was a combination of scrubby woods and lawn carved in between trees.  There have been at least four stages of tree cutting that I have been around for.  I remember one day, way before these photos begin, when I was picking up sticks in the spring, and I had ventured into this brushy, wet, rough, hilly, crappy piece of land and was rounding up the larger limbs and such, one of the neighbors slowed down and called out the window "are you going to keep going until you can mow it?"... the answer was ...
Yes.


From the road in the Beginning seven years ago

From the lawn in the beginning
The biggest change came when Tim cut over 120 trees out to clear an acre of land for his big three bay garage.  Stumps were pulled, gravel was brought in, and half of the area became a driveway.  There was a strip of lawn, and he added a split rail fence along the property line which we landscaped in with neighbors Mike and Shelly. 
 
 
From the garden two years ago

 There were a dozen or so scrubby, top heavy ash and poplar which we landscaped around but slowly, one by one, removed completely.


From the garden two years ago
 What had been a wet and uneven strip became lush green lawn.  Near the road, there was still an area of large oak trees on Mike and Shelly's side of the line.  The changes in use and grade of the surrounding land was causing water to pool, and the oaks were slowly dying.

 
This past January we had a tree service come in and remove them.  This gigantic mess was worked on for months.


Logs were hauled to the mill to be salvaged as lumber.  Stumps were ground.  Loads of gravel and top dirt were brought in as well as new trees, a second section of fencing and grass seed.


The Finished Product from the Lawn
Towards the end of summer, Mike's new lawn near the road had thickened up, and it was time for the final addition, two large Crimson King Maples which he and Tim planted this past Saturday.


The Finished Product from the Road
The final transformation, which began the end of January is now complete.  The final count is 9 Blue Spruce, 4 London Plain Sycamores and 2 Crimson King Maples.
 
We are done picking up sticks, and now that it is mowable, we can quit.