Tuesday, May 28, 2019

Memorial Day 2019

Around here, Memorial Day weekend is THE big gardening weekend.  Some people get their garden tilled up, head to the greenhouse, and stock up on plants.  They spend all day planting and seeding and staking.  This year on Saturday evening we had an inch and a quarter of rain fall in about half an hour.  I know of at least one garden that got washed away.  Not mine.  Of course by this time I've been gardening for months, but Memorial Day is the deadline.  So I also had a busy weekend.  While I've been at this for months, I still had four beds that hadn't been touched.  I cultivated and amended them and I planted buckwheat in a couple that are not going to be used until later.

Bed #1:  Vacant - planted buckwheat - cucumbers later
Bed #2: Lettuce planted and cucumbers just now germinating
Bed #3: Peas planted - bush beans later
Bed #4: Peas planted - bush beans later
Bed #5: Sweet corn seeded and pumpkins next weekend
Bed #6: Soil warming for sweet corn
Bed #7: Cantaloupes seeded
Bed #8: Tomatoes and eggplants - mulched and finished
Bed #9: Peas planted  - buckwheat later - lettuce added
Bed #10: Peas planted  - buckwheat later - lettuce added
Bed #11:Buckwheat and a zucchini seeded
Bed #12:Vacant - buckwheat later - this is my nursery bed
Bed #13: Cauliflower and Broccoli
Bed #14: Potatoes growing fast
Containers: Carrots getting their first true leaves


Still waiting on my cauliflower and broccoli to do something.  But it's a pretty bed.  The plants are big and healthy.  The soil looks perfect.  Its nice to walk by ten times a day.


The potato plants visibly grow taller each sunny day.


The tomato and eggplant bed is finished, mulched, and I planted basil in between the tomato plants.  There are also Nasturtium seeds in there. 


I planted rows of lettuce along the east side of two pea beds.  I still have enough transplants for two more rows but I am holding them back.  I will begin trimming lettuce for salads today.


This is the lettuce I stuck into the ground and ignored.  I only lost one seedling.
There are cucumbers seeded along the left side.


So far just one tiny cucumber plant.  


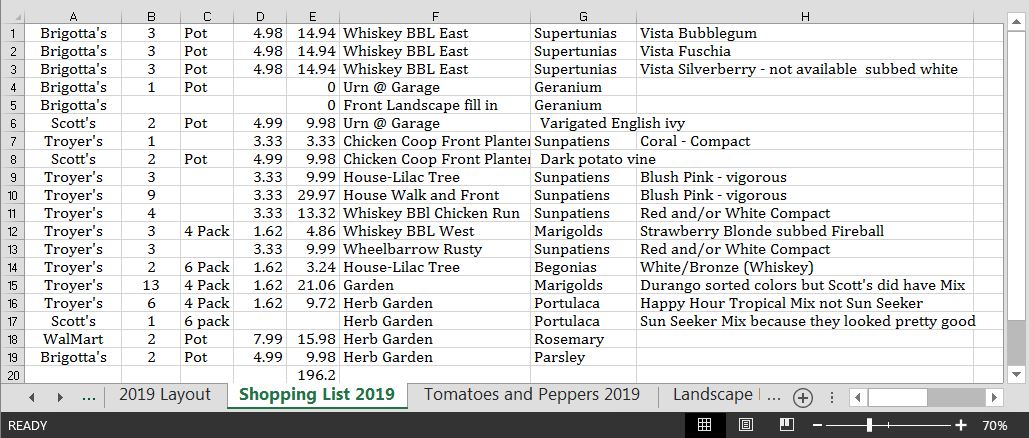
This is the last bed to be cultivated.  It is nearest the gate and the water so it usually ends up as my nursery bed.  It will get buckwheat later.  I have my late lettuce babies, some spare Marigolds and all of the Sunpatiens and Begonias that go in the front landscaping.  There are also volunteer Calendula growing well at the far end.  When I get a minute I am going to transplant some of the Calendula into four inch pots.  I took a minute and transplanted the Marigolds from cell packs into four inch pots.  It is IMPOSSIBLE to keep cell packs watered out in the open sun/wind.  Some of them have an intended home, but this will buy me some time and any leftovers will go into gallon pots.


We are still in construction mode.  
We have been stockpiling city street bricks for walkways.


We had a large Hemlock tree on the property line with our next door neighbors.  Have you ever had a tree that was just in the wrong place?  Especially a dirty tree that drops a lot of cones or nuts or needles?  This one had worn out its welcome.  We have a walkway that goes past there and it is always full of Hemlock crap, and in the winter, the roots heaved the edging and it was basically a mess.   The tree also did a lot to shade the portion of the lawn that we call "Lake Johnson".   Tim said he could hear the lawn drying out as soon as that tree was gone.  After it was gone, the neighbor wife came over to survey he hole and asked what we were going to plant there to replace it.  Well, that's fair.  I suppose they can have a large bush or a small tree.  We had at least figured on an arrangement of tall grasses and some more rocks.  Once Tim gets the roots pulled out and the hole filled, we'll go shopping for a shrub.

It seems like there is always an empty hole around here that needs to be planted...

Wednesday, May 22, 2019

Surviving Greenhouse Season


Greenhouse Season, the most wonderful time of the year, is finally here!  In Zone 5 anyway.  Those of you in Zones 6-7 or higher are already planted and maybe even harvesting.    Those of you who got snowed on this week - you have my sympathies.  We have had one of those Mays where people are having to put off planting.  We've only had two light frosts, but the ground has been wet, and the sun hasn't shone and overall it was hard to get into the spirit.  Also, the plants are behind schedule.  There just hasn't been any sun and things are not growing well.  Up until this past week, things have looked pretty lack-luster.    But now it's Game On!

Last weekend the Home Depot garden center was a mad-house.  People were buying mulch and potting mix and hanging baskets by the truckload.  I slipped in quietly to get a few supplies while hubby bought some bolts at the other end of the store.  I retreated to the car parked in the lot which was even more frightening.  I prefer to do my shopping during quieter times.  In fact, I have a very well thought out, tried and true method for surviving greenhouse season.  Each year I spend about $200 on annuals and some replacement perennials.  I frequent six greenhouses, and check out three or four more.   Even WalMart and KMart can have some unique, hard to find items.  But they might kill them before you get there.

Me at four years old in our geranium house
Since I was practically born in a greenhouse and spent many hours behind the counter as well as shopping I consider myself to be a bit of an expert.  So here is my advice:
  1. Make a List
  2. Conduct Reconnaissance Missions
  3. Bring Appropriate Footwear
  4. Get a Cheap Tarp
  5. Bring a Box
  6. Read the Tag
  7. Buy a Spare
  8. Take Notes


#1. Make a List:  how are you supposed to navigate this field of choices without a detailed plan?  Everyone has their own method of keeping track and mine might be a little excessive.  I keep a spreadsheet with a tab for each year so I can refer to last year's list and make changes as I go.  It is important to keep your numbers in individual plants, not in packs because if you need 24 marigolds and you mark down four packs because last year you bought four 6-packs, you may be surprised when you come home with 4-packs and only have 16 marigolds.  This is the voice of experience speaking.....


#2. Conduct Reconnaissance Missions:  Each year I am frustrated by the ever changing national gardening trends as well as the individual grower's reactions to the market.  One of my favorite greenhouses used to have two large houses full of individually potted Calibrochoa, Wave petunias and Supertunias.  This year they potted them all up in their own combination pots or baskets leaving only a few dozen flats of leftover singles to choose from.  Combination pots do me no good.  Even if I could get the monsters home easily and transplant the plants without damage, I'd soon have a huge inventory of unwanted large containers.  But that doesn't mean you can't find what you want at another greenhouse.  That's why I like to make the rounds first and rework my list before I start back at the beginning and start buying. 


#3. Bring Appropriate Footwear:  I conduct most of my buying and reconnaissance during my lunch hours.  Greenhouses deal in soil and water.  When you mix soil and water you get mud.  Some greenhouses have nice wide concrete paths, but even those can have low spots.  I keep a pair of garden clogs in the trunk of my car so I can slip them on instead of having to clean mud out of the treads of my good office shoes.

#4. Get a Cheap Tarp:  A trunk load of plants can make a real mess.  Dropped soil, petals, leaves and water don't have to be cleaned out if you just keep a cheap plastic tarp handy.  Line your trunk before you load it, then just pull the tarp out and shake it when you unload.  Voila'!  Clean car.

#5. Bring a Box:  We used to always provide boxes to our customers.  In the evenings Dad would take the truck to one of the local convenience stores and load up all of the boxes that soda shipped in.  They were the perfect size.  When we ran out of those, we did have custom boxes that we purchased flat and stapled together as needed.  This was less expensive than letting our customers run off with all of our plastic trays.  Modern growers don't seem to care.  And that, my friends, is why our oceans are full of floating plastic.  We also used to plant in peat pots and terracotta, but I digress.  Sure, if you are buying three full flats of marigolds, take the trays.  You may be able to use them at home if they're any good.  I have even let the containers influence my buying if I, for instance, need a couple more really good gallon pots to fill out my inventory at home... But if you are picking up two packs of this and a few pots of that, it's more convenient to walk around with your own box.  The tops of copy paper boxes are perfect for this.  I always have one or two in my car.


#6.  Read the Tag: You can probably skip this step if you are buying the same variety year after year.  But my neighbors get caught out now and then because they can't remember there are more than one kind of yellow marigold.  Janie, Safari, and Inca are very different critters.  Janie gets 6-8" high, Safari 10-12" high (fact: that's potentially twice as tall as the other one :/ ) and the old style Incas would be 18" or more.  And it doesn't hurt for an old pro to freshen up on the facts now and then either.


#7.  Buy a Spare:  I've always said that if you want to be bold, plant a pair of something but if you are a real risk taker, plant a whole row.  Nature laughs at symmetry.  One or more plant will either be eaten by wildlife or lack the will to live.  Also, no matter how closely you scrutinize a flat of annuals, you cannot guarantee that every cell has a plant in it or that every plant will be vigorous and healthy.  I usually buy a spare of everything and pot them up for use later.  If nothing else, you can use them to fill in bare spots late in the season when early plants are beginning to die back or lose color.

For instance, these three spare plants later went to fill a bare spot near our front steps, and due to their special care in the spares area, they far out preformed all of the similar plants I put in during the earlier planting season


And finally, #8. Take Notes:  If you potted up a beautiful combination pot that you would like to duplicate in the future, write down how many of what went into it.  Take notes of which greenhouse had the exact mix of marigolds you prefer so you won't have to go searching or miss out on what you want.  Keep track of your costs so you can budget the right amount next year.  Add all of this to your list (See #1) and you are all ready to start again next year.


HAPPY PLANTING!

Sunday, May 19, 2019

May Progress Part 2


Considering the mild, rainy and overcast days we've become used to, today was a rather brutal day of sun and wind.  I had to throw a shade cloth over the cauliflowers but the potatoes are loving it and grew an inch since this morning.  This week's forecast is fairly mild and I wanted to take advantage of that, so it's time to transplant the tomatoes.  Yesterday I prepared the bed.  I added bone meal, worm casting and some light fertilizer and dug a trench down the middle.  I set my tomato ladders and I'm ready to go.  Seven weeks of daily attention, coddling and anticipation and it's time to leave them out in the elements.  I'm confident they can handle it.


Yesterday I tipped the tomato plants over so the growing tips would curve up over night.
The spare plants spent the day in full sun and wind but these got a break from noon to four o'clock so they wouldn't be too beat up.  But at four o'clock I was ready to be done for the day and the clouds were moderating the sun so we were ready to go.


I lay the plants in the trench with the tips supported by the ladder.  I trimmed any leaves that would be under the soil and also shortened the branches that would be dragging in the dirt.  This left each plant with the growing tip and two branches.


Now all that needs to be done is to slide off the pots and back fill the trench.


And just like that, twelve inch tall plants become six inch tall plants.  I watered them in very well and I will water again in the morning.  In the next couple of days I will plant the eggplants down each side and seed the nasturtiums.  Each bed will also get a marigold at each corner

Out of fourteen beds I have six left to plant.  Four of these need to be dealt with over the next week.  The last two can wait.  We finally got the lawn rolled and I've weeded all of the landscape beds but we haven't even begun the four plus days of edging and mulching.  And frankly, neither one of us is in a hurry. 

Bed #1:  Vacant - lettuce then a later planting of cucumbers
Bed #2: Lettuce planted and cucumbers seeded
Bed #3: Peas planted - bush beans later
Bed #4: Peas planted - bush beans later
Bed #5: Vacant - prepare for sweet corn and pumpkins
Bed #6: Prepared to plant sweet corn and pumpkins/squash
Bed #7: Vacant - prepare for cantaloupes
Bed #8: Tomatoes planted eggplants to come
Bed #9: Peas planted  - buckwheat later
Bed #10: Peas planted  - buckwheat later
Bed #11:Vacant - buckwheat later
Bed #12:Vacant - buckwheat later
Bed #13: Cauliflower and Broccoli
Bed #14: Potatoes planted
Containers: Carrots planted


Saturday, May 18, 2019

May Progress


The tomatoes and eggplants are on their last weekend of intensive baby-sitting.
The spare tomatoes have been transplanted to gallon pots.  The plants that are going in the bed tomorrow are laying on their sides so the growing tips will turn up and I can plant them horizontally to get a better root system.


My broccoli and cauliflower are looking pretty good.  Especially when I compare them to the transplants available in the greenhouses.


I study them each day for the first signs of buds


The lettuce transplants that I half heartedly stuck in the ground are doing well


The potted lettuce transplants are ready to plant
The flat on the right that is taller spent two weeks under grow lights in the basement.  It did give them more growth, but they are not as stocky and strong as the outdoor plants.


Both plantings of all four pea varieties came in well.
Last year I had two kinds that were very sluggish.  One sluggish variety was the Penelope peas shown above.  This year they are thriving.  They turned out fine last year despite their sparse start so I have high hopes for these rows.
Other happening that are not photo-worthy:  the potatoes I planted last weekend are just beginning to poke through the soil and the carrots are beginning to germinate.


The tomato and sweet corn beds have been amended and prepared.  I am trying to warm the soil with polycarbonate greenhouse panels before I plant the corn.  I dug the tomato ladders and cucumber trellises out of storage and brought them up to the garden.


The catnip and spearmint have been re-potted.  If I don't dig them up, amend the soil and replant the main growing tips the whole pot will sit and sulk until I do.  For supposedly invasive, hard to control plants they are pretty docile and a bit finicky when potted.  I have to keep a wire cloche on the catnip or stray cats will come in and destroy it in the night.


Ninety percent of the annuals have been purchased.  Two flats of marigolds, a flat and a half of Sunpatiens, half a flat of begonias and some portulaca.  I keep the frost cover handy to place over them on cold nights or very sunny days when they could sunburn.  The floating row cover allows about 85% of the sun to come through which is similar to the greenhouse conditions they've been grown in.  If you have the time and ability to harden off greenhouse plants it can't hurt. Today I purchased the potting soil and pots I'll need this year and now I have a lot of planting to do.  When I plant annuals into the mulched landscape I put them in large fiber pots with good potting mix and they do much better than the ones that are planted directly into the native soil.


Daffodils are on their way out


The south walkway construction is done.  It was so wet and mucky when Tim was laying this out that when he placed the last railroad tie across the end into the area he had dug out, it floated in the water that had back-filled.  Yes, floated.  He had to stand on it to pin it down.  Yucky  Mucky.  But I'm really enjoying my new walkway and use it daily.


This ^ was the working conditions the days the walkway went in.
This is also why we are redesigning and landscaping the backyard.  It's an unmowable swamp that requires french drains and gravel.


The patio where the walkway pavers were has been dug out.  The sand and gravel mix went to extend a driveway back into the woods


We will replace the RR ties with newer more solid ties and fill the bed with topsoil dug up from other areas of (de)construction.  The top soil will be mixed with compost and I'll have all year to condition it and de-weed it to be ready to use next year.


Phase two of lawn re-construction and re-landscaping involves placing pavers out into the lawn.  
The second layer RR tie will be cut back and the ground beyond leveled.
The landscape bed to the left will be reshaped.


The garden looks pretty wide open today but there is a lot going on.  It's May and EVERYTHING needs to be done.  This year May has been wet and gloomy.  In addition to recording rainfall on my calendar, I've also begun recording sunny days because they have been so rare.  We've had four sunny days this month, and today is the 18th!

Tomorrow's To Do List:

Seed Cucumbers
Transplant Tomatoes
Begin potting Sunpatiens and begonias

Sunday, May 5, 2019

The Litmus Test - Soil Testing

Do you test your soil?  They say you really should if you are going to start adding particular elements to it and not just organic matter (compost).  Why would you add Potash if you already had an excess?  Exactly HOW much Nitrogen should you be adding?

There are many universities which offer soil testing through their extension offices.  But to be honest, the sample prep instructions can be a little intimidating.  So just how good are the over the counter tests?  Accuracy varies by technique of course.  I have a scientific mind (according to NY State standardized testing and Facebook quizzes) so I decided to give the tests a try.  I did watch a bunch of Youtube videos to gather info and to learn from other's mistakes.  What did we do before Youtube? 

I took a half cup sample from the center of each bed, from the layer that lies about 4 inches deep,  placed them in labeled quart jar and mixed it 1 to 5 (2.5 cups) with distilled water.  Then I shook the sample well to "dissolve" it in the water, and let each sample sit for almost 24 hours.
The Luster Leaf 1601, which I purchased on Amazon, contains four test vials, and ten capsules for each type of test.  You can test four attributes of ten samples.  You pull apart the teeny tiny capsules and empty them into the left side of each vial.  Then, you use the supplied eye-dropper to add your sample water.  Shake the test well and let it sit for a couple of minutes.  Then you have to interpret the subtle shading by comparing it to the colored scale provided.  The Acid test and the Potash test registered pretty clear results.  The Acid was actually easier to read in real life than it shows in the photos below.  The Phosphrous and Nitrogen were more subtle, but did vary from bed to bed.

Each of my twelve raised beds have had the same components added to them over the years.  The same starter soil.  The same compost in comparable amounts.  Similar soil additives each year.  But they have different crops grown in them each year.  If I am growing tomatoes or cucumbers I am more likely to add nitrogen.  If I am growing peas or a cover crop I am not adding anything that season.  And they have developed differences over the years.  This is apparent in my annual growing results

Here are the results for my seven samples.  I did test the cauliflower bed a few weeks ago before I planted them, but I did not take a photo.  Results were PH Neutral, Adequate for Phosphorous, Depleted for Nitrogen and Adequate for Potash.  I think these photos will be useful for future reference.

Bed #1
Acidic, Sufficient for Phosphorous, Depleted for Nitrogen, Adequate for Potash
This bed had a cover crop of buckwheat last year

Bed #2
Slightly Acidic, Depleted for Phosphorous, Adequate(ish) for Nitrogen, Sufficient for Potash
This bed had a cover crop of buckwheat last year 
Beds 3 and 4 have peas planted in them.  Peas grow well in "poor" soil, 
so I did not test this year
Bed #5
Slightly Acidic, Depleted for Phosphorous, Adequateish for Nitrogen, Sufficient+ for Potash
This bed had a cover crop of buckwheat last year
Bed #6
Slightly Acidic, Depleted for Phosphorous, Adequate for Nitrogen, Sufficient for Potash
This bed had a cover crop of buckwheat last year
Bed #7
PH Nuetral, Adequate for Phosphorous, Adequate for Nitrogen, Sufficient for Potash
This bed had cucumbers in it last year
Bed #8
Slightly Acidic, Depleted for Phosphorous, Adequate for Nitrogen, Sufficient+ for Potash
This bed had cucumbers in it last year

Potato Bed
PH Neutral, Adequate for Phosphorous, Adequate for Nitrogen, Adequate for Potash
I expected this bed to be more acidic judging from the amount of moss it grows.
So what do the results above tell me?  My soil, overall, is more acidic than I thought it was.  That doesn't really concern me at this point, but I'll keep an eye on it and perhaps add some garden lime to my composted horse manure as I amend the beds.  I have lime on hand already.   The Nitrogen could use a little boost, but I habitually do that by adding blood meal at the time of planting.  The Phosphorous needs attention.  I have not concentrated on adding that in the past.  How do you add Phosphorous to your soil?  Bat Guano, Bone Meal or Rock Phosphate.  I will probably go with the Bone Meal which has a 4-12-0 N-P-K ratio.  N (Nitrogen) P (Phosphorous) K (Potassium) 

I think the over the counter soil tests worked fine.  The results weren't really surprising.  I will continue to do what I have been doing, but this year I will buy a good sized bag of Bone Meal (P) to add as I plant along with the Blood Meal (N).