Showing posts with label Tips & Tricks. Show all posts

Wednesday, July 30, 2025

Long Term Fixes

Sometimes you will have something to fix in the garden that takes a long... long... time.  Back in March, when the snow melted, I noticed that we had a Vole that had nested in one of the evergreen grasses that are up against our deck.  And also that the three Prima Ginger Echinacea plants had suffered quite a bit of Vole damage.  Bed and breakfast. The one in the bottom right corner of the photo below was completely adrift having had all of its roots eaten off below the surface.  The other two also had the delicate roots completely eaten, but each was still anchored by one root the thickness of a pencil.  I heeled the other two in well, but the one that was completely detached I took into the garden, potted in a gallon pot, and left it there in the garden where I could keep an eye on it.


When gardening activity began in May, I would keep it watered and about once a week I would lift up on it to see if was growing any roots.  It was putting out green leaves, and little white hair roots, but they were not anchoring it to the soil.  It needed water at least twice a day and would sometimes look awfully wilted and miserable.  Still I did not give up and around Mid-June it finally gave resistance to being moved and at that point it took off and even flowered.  The other two that I left in the bed were fine with their single roots and grew as normal.  So how do I prevent this next winter?  For one thing I am cutting back those Carex grasses.  Also, I will put wire cloches on the Echinacea and pin them down hard.  In the past, the wire cloches have proven to turn the voles away from Primrose and such.


There is a product created to protect fine roots in Vole situations.  They are essentially chain mail jackets and can be purchased on Amazon.  After the damaged one had rooted in pretty well, I transplanted it into one of these bags.  You just put the bag in a gallon pot and fill with soil.  I gave it some more weeks to recover from that, but it was no longer happy in a pot, difficult to keep watered in this hot weather.  Now it is planted back in the landscape and has perked back up.  When we clear the beds in the fall, I will unroll to top of the bag and hopefully, the combination of cloche and bag will protect it.  I have hesitated to dig up the other two and bag them because they have been growing so well.  Maybe later.

By the way... those red (actually deep tangerine) I started from seed this spring.

I'm still working my way around all of the Daylilies, cutting them back.  The first ones to be cut back have already pushed new growth, and some of them are even putting out new flower stems.


There are a few Daylilies that I simply removed.  I don't like their color or form well enough to try to protect them, but I still don't want the deer eating them.  I'm replacing them with something I like that the deer don't like so much.  Choose your battles.  So now I have a few open holes prepped for next year.  The Daylilies had already outgrown their holes anyway.


As I am clearing the planting spots, I am correcting another mistake I made.  Some of the holes are just too close to rocks.  The below hole, for example, was very difficult to get past the rocks and down to ground level to cut off the foliage with a trimmer.  I cut out a larger space in the road fabric and I am replacing the Lily, which had to be cut to the ground once or twice a year, with something that doesn't require such drastic pruning.  Probably a Butterfly Bush.


While we are out here, take a look at these volunteer Petunias.  This is one of the planters that took the place of the Whiskey Barrels.  I planted Yellow River Hosta in them, and I think that when those plants are mature, their large, three foot span, will look quite impressive in these planters.  In the mean time, though the Hosta are doing well and putting on new growth, they don't look very pretty.  Four or five years ago I had planted Sugar Daddy Petunias and each year I get some volunteers seeding themselves.  Even though I completely dumped the soil out of these planters, turned it over, and put it back, the Petunia seeds were just waiting for another chance to do their thing,

The Hosta makes a nice center piece, but until it fills the pot, we can have other things in there too.

Thursday, July 17, 2025

Things to Always Keep in the Garden

I was thinking the other day that there are always a few things that you should keep easily to hand in the vegetable garden.  I was doing my morning check before my walk and found two fresh blooms on the zucchini.  Not the first by any means, but I had snapped the results of the first three off because they were not fully pollinated and were developing lopsidedly.  When you have a whole lot of something, it doesn't make sense to try to save imperfect results.  So they went into the compost.  Although there was a bumble bee in the flowers, I decided, to be safe, I should hand pollinate them.  There are two ways to do this.  I could pick the male flower, strip the petal off, and stick it into the female flower, transferring the pollen.  Or I could go to the garden shed for a small paint brush.  When I was done, I stowed the paint brush in my tool box inside the gate for quick access later on.  I had neglected to move it this spring when I transferred necessary items out there,


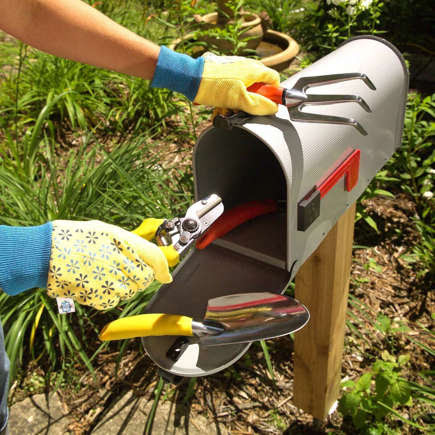
Many people keep a simple mailbox in the garden.  It holds plenty of tools and is weather tight.  My garden tool box is a gas station island windshield service box from the 1950s.  We had one kicking about, excess to requirements of my husband's gas station collection.  It is also weather tight and has the added advantage of having a paper towel dispenser in the bottom.  It holds the flimsy paper tri-fold towels which are perfect for drying your hands from washing in the garden hose and go right into the compost where they dissolve quickly,


The next most important item is a weed pan of some sort.  This doesn't have to be a large trug for major weeding but just somewhere to drop a few weeds you might not otherwise pull if you didn't have a place to put them,  For this I have an old enameled strainer.  A second hand colander would also work.  You want something that is going to drain rainwater and not make weed soup.  Mine stays in the corner by the gate post all year round collecting strawberry hulls and windfall apples and paper towels.  When it fills up I dump it in the compost or the weeding trug.  Whichever is most appropriate.


The rest of the list of necessary tools is as follows:

    • Shears and/or knife
    • Clips
    • String
    • Gloves
    • Trowel
    • Dibber
    • Small Paint Brush

The trowel and the gloves are self explanatory.  The scissors and/or knife are for quick snipping of a tomato or zucchini so you are not tempted to rip it off and damage both the plant and the fruit.  Planned harvests might require a hod and a pruner, but I often see something that either needs to come off because it is rotting or as a last minute lunch idea.


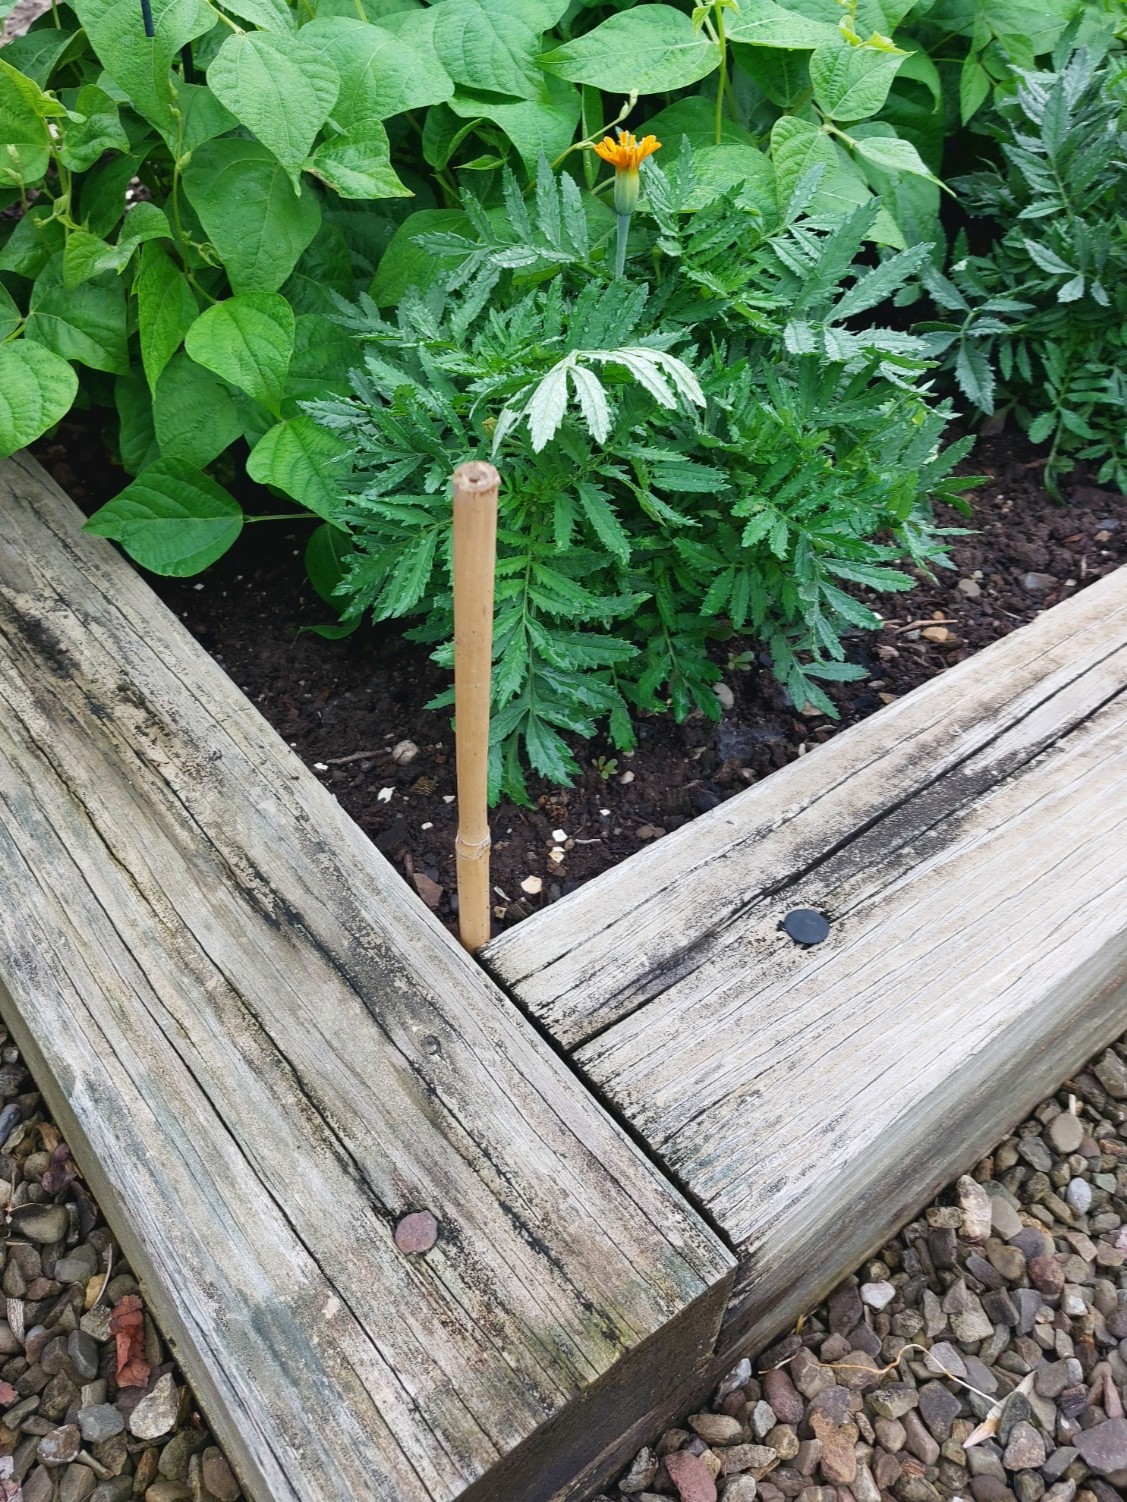
The string and clips are for tying things up.  Maybe you see a stray cucumber vine or you have a few minutes in which to add another layer to your Florida weave.  You might put it off if you had to go get the supplies.  The final item is a dibber of some sort.  I always have a short piece of bamboo or something stuck into the corner of a raised bed.  This is for poking a seed under the soil, or even uprooting a stubborn weed.  There are many occasions where I am looking around muttering...
 "where did I put that stick?"


Those are my essentials.  Other things tend to migrate there through the season.  Clothes pins for securing row covers to the fence to dry or a measuring cup for mixing deer repellent.  I usually have a few different hose nozzles rattling around in there.  Cable ties.  A bungee cord.  Scrub brush for pots and fingernails.  The important thing is to have a box or at least a wire basket to collect weather proof items.

Daylily season is coming to and end.  It is time to start switching over to 
Dahlia of the Day:  City Lights


Monday, June 6, 2022

Warm Soil

When making planting schedules, too many gardeners look at the last frost date or the daytime temperatures for the coming week.  What we really need to be looking at is the soil temperatures and the night time temperatures.  I've done a lot of extra soil warming this year and I'm seeing the difference right away.

Cucumber and Squash plants under a row cover

I typically seed my cucurbits in pots where I can keep an eye on them instead of putting them directly in the ground where they are at the mercy of rains and clay based soil sealing over them and pushing them too deep.  This year I added a square of row cover just to keep busy birds off of them.  The warmer microclimate created by the little "greenhouse" made an immediate, noticeable difference in speed and percentages of germination.

This year I am going to try covering the cantaloupe vines with a heavy frost cover.  It will be open on the ends to let in pollinators and the vines will be able to push under the sides.  I have not put a thermometer in there, but any day if you put your hand under there, the air temperature is noticeably warmer.  That will help a lot considering that our forecasted temperatures right now are only in the low 70s during the day.  The seedlings are just forming their first true leaves now,


Two of the three varieties of summer squash had already put out their first leaves and were transplanted yesterday.  I put a basket over them to protect them from birds and give them a little transition from the row cover to direct sun,  I am also going to try caging them again this year because I liked how it worked out last year.


My pole beans were planted a few days ago and germinated right away.  Below is the bed warming with the polycarbonate panels.  I have never bothered to warm the soil for beans, but when I moved the panels off of the bed to plant the second bed sweet corn it was just easier to put them on the bean bed rather than lug them back into storage.  Once again, laziness scores an accidental success.

Pole Bean Bed warming

Even the older seed germinated right away.  Which is better than I can say for the Jade bush beans I planted a week earlier in the next bed without warming the soil.  I am still waiting on those to germinate.  There are half a dozen plants up but that is a very small percentage of what was planted.  From here on out, I will always warm the bed for beans.  Right now the panels are on the cucumber bed warming it for transplants.

Old Monte Gusto seed (packaged for 2020) germinating very well.

This is my first lesson learned from the 2022 growing season:  Soil Temperature is even more important than you thought it was.  Yes, having raised beds gives you warmer, drier soil than an in ground garden but even that can be boosted a bit.
 
Sorbet Peony in full bloom

Saturday, May 9, 2020

Starting Seedlings Indoors

When I was little I remember well my father seeding flats in the seed room of our greenhouse.  It was a humid little room with plastic curtains around the benches to hold the moisture, and a misting system that passed over the benches a couple of times an hour.  He started with a full tray of seed starting mix which he scored in rows by pressing a piece of plywood with rows datoed into it every two or three inches.  He would place the seeds very close in their rows.  What you would end up with is one tray of a couple thousand seedlings shoulder to shoulder. When they were ready to be transplanted you could reach in with your fingers and scoop a chunk of seedlings out and set them out where their roots could easily be teased apart for individual placement in their big boy pots. It conserved space and enabled you to repot them however you wanted without risk of damage.

My Dad and little sister transplanting Coleus
 into individual pots 1975
When I started seeding my own vegetables at home (in the dining room) I went through the learning curve every one else does.  I did invest in a nice set of grow lights which weren't particularly cheap but have lasted ten years and still going strong.  I started with the Jiffy peat pellets which were a PITA.  You can't get the seedlings out of the pellet if you have to replant them deeper.  They're locked in there as if they had concrete shoes.  And the mesh that holds the mix together never fully disintegrates, and you will find them in the garden months later still wrapped around the roots.

Next I tried seeding directly into pots.  That system was somewhat flawed as well.  If you place one seed in each pot, and the one seed refuses to grow, you have to reseed.  Then that one pot is behind all of the rest of the seedlings so it still needs a dome and constant moisture while the others are moving on.  So I tried placing more than one seed in each pot.  Then you have to thin them because both (or even all three) come up.

The best way to thin them is to snip off the weaker one with scissors so you don't damage the roots of the one you're keeping.  But what if they're both really nice?  And you have that empty pot from the one that won't germinate.  So... you go get a pencil and uproot both of them so you can replant the one deeper, and fill your empty pot.  So.... again, why are we seeding directly into pots?  If we have to play musical pots?


Then I went back to my roots so to speak. I bought bottom watering cell packs.  Don't let the cells fool you.  I don't use those or at least not at first.  You start with the solid trays and the domes.  Fill those with seed starting mix and seed little clumps of seedlings.  Put the humidity dome on, and put them under a grow light on a heat mat.


A lot of people struggle with the logistics of the whole light and heat mat thing.  Yes, you are right to think that they don't need the light while they're germinating.  And no, they don't need the mat after they start growing.  But that doesn't mean you have to juggle things around.  If you start with both a light and a heat mat, then the first ones to pop up get the light and avoid getting too leggy while they're waiting on the stragglers.  They won't mind having warm feet and a humidity dome.  Although they'll soon out grow the dome.  When that happens, take the dome off and turn off the mat.  No need to rearrange anything.

Besides having heat mats, and grow lights, another requirement is a small fan and a timer to run it.  Giving your seedlings a shot of wind several times a day will stress them just enough to toughen the fibers in their stems.  It also encourages them to stay shorter and stockier.  I'm not sure how they know but they do.  And you want a timer for consistency.  Yes, you could turn the fan on once a day for half an hour but would you remember to turn it off?  I set mine for three half hour increments throughout the day.  I also have the light on a separate timer which turns it on at 6 am and off around 10 pm.

My setup includes a dual power strip.  One side is on continuous
for the heat mat, and the other side times the lights.
The fan is plugged into a wall timer that turns it on for several
half hour intervals throughout the day.
In addition to strengthening the stems, a fan improves the air flow so you get less mold.  But if mold is really a problem, just sprinkle your starting mix with cinnamon after you plant your seedlings and you won't have any mold.

Another consideration is that you have to plant like items together.  I found out years ago that if you put tomatoes and eggplants under the same humidity dome you are quickly going to run into a conflict of interests.  The tomatoes will be on their way out before the eggplants have even germinated.  And if you have them somehow connected in packs then you have a problem.  Take good notes of what happens this year.  Now I plant eggplants and peppers together or eggplants and cauliflower, because they are like-minded plants keeping a similar schedule and they need a least two weeks longer than tomatoes.

The six eggplants on the right were seeded with the Cauliflowers,
weeks before the tomatoes.  The Cauliflowers are already set out
and the Tomatoes are in gallon pots in the cold frame.
The Eggplant babies are now keeping company with the Borage starts on the left

As for what is going on in the garden today:

Rough winds do shake the darling buds of May

And its snowing.

Thursday, March 26, 2020

Garden Truths

Spring is the time of year when new gardeners are just starting out and they have a million questions that some of us old pros find either laughable or just plain aggravating because we've heard them so many times.   Of course there is no such thing as a dumb question (yeah right), so on the Facebook gardening pages the same old questions are answered over and over.  Day in day out.  And never more than now during the Covid-19 quarantine when the entire free world has been told to stay home for weeks if not months and not empty the grocery stores over every edible crumb.  Rant over.


Gardening suddenly became extremely popular so here we go again with some basic gardening truths that may help some beginners.

Gardening Truth #1.
Forget the weed block.  Weeds don't come up from below.  They blow in on the wind or they creep in from the edges.   Now if you just put down weed block and make it into a walkway then it works fine.  But as soon as you put soil or mulch on top of the weed block, the soil grows weeds.  Someone has made a fortune selling that useless product to gardeners.  Save your money and a ton of aggravation and just don't use it in the first place.

The one proper use of weed block would be underneath walkway material.

I call B.S. on this one.  Creeping Charlie was never so easily defeated.
There would still be vines even if the leaves were burned.  Someone cleaned that last one up.  And left long enough the Creeping Charlie would come up over the edges.

Gardening Truth #2.
Early is not always better.  Whomever thought of selling carrot seedlings to newbie gardeners is a cruel bastard.  They always grow in a knot (or whatever shape you leave them in when you stuff their taproot into the soil) and look like they're diseased.  Some plants do not do well being forced into an early season by growing under lights.  Be patient.  Direct seed your carrots.  And sweet corn. ... and bush beans.  You will need more plants than you could ever start on your window sill if you want to make a meal.


Gardening Truth #3.
There is no substitute shortcut for weeding.  (See Gardening Truth #1)  You can reduce the quantity of weeds over time by carefully managing your soil and staying on top of things.  But there is no store-bought product that can give better results than simply bending over and pulling it up.  Seriously.  Besides, its good exercise.


Gardening Truth #4
Don't Zone Out.  Know your gardening zone.  It takes less time to type the question into Google than it does to ask someone and have them tell you to type it into Google.  Because it is zip code specific.  And even then, you should look closely at the map because elevation can alter your zone just a bit.  Knowing your zone and reading your seed packet will save you the disappointment of planting too early or the frustration of having to cover everything when there is a freeze warning.

USDA Plant Hardiness Map
Gardening Truth #5
Wrap that rascal.  The best way to discourage or destroy pests is to starve them out.  Interrupt their life cycle.  And the only way you are going to starve them out is to block their access to your plants.  And the most effective and least invasive way to do that is with a barrier.  Fence them out.  Cover your plants.  That way you won't even have to identify your bad bug and figure out how to fight it.  How do you keep moths from laying eggs on your cole crops?  cover them.  How do you keep birds from eating your berries?  cover them.  How do you keep Japanese beetles from turning your bean leaves to Swiss cheese?  cover them.


So those are my responses to two weeks of Facebook questions asked by enthusiastic beginners who are trying to find the shortcuts.  I'm not saying there are no shortcuts. Covering all of your vulnerable plants is a shortcut.  But gardening does require consistent dedication, some work and a lot of trial and error.

Friday, August 9, 2019

An Ounce of Prevention

Over the years I've learned a few simple gardening methods which make gardening so much more enjoyable.  They fall under "risk avoidance".  There are problems you can avoid with good planning and never have to deal with them at all.  When I see people searching for a solution for a problem I just want to tell them how they could have avoided it completely.  Some things cannot be fixed.  But an ounce of prevention is worth a pound of cure.

The answers that the Gardening Public usually throw at the poor people is "Try Epsom Salts"  or "Water more".  Well, I don't know what your gardening problem is, but unless it is a magnesium deficiency in your soil, Epsom Salts will probably not cure it.  Just sayin'.  Buying a good old fashioned real live paper gardening book wouldn't hurt.


Problem: Bitter Cucumbers
Solution: Choose varieties that are gynoecious (produces only female flowers) and/or parthenocarpic (produces fruit without fertilization).  My favorite variety is Bristol.  Apparently, bitter cucumbers come from male pollinated fruit.  And it seems to be made worse by inconsistent watering.  I buy my seeds from Johnny's Seeds and they always label their varieties well. Also, when in doubt - water.  Sometimes it can be difficult to decide whether you should water or not.  If you aren't sure - at least water the cucumbers.  And the bush beans.  More on that later.


Problem: Powdery Mildew on Squash
Pre-Emptive Solution: Choose varieties with high resistance.   This usually means planting F1 hybrids, not heirlooms or fancy foreign varieties, but at what price sanity?  My favorite variety many years running is Dunja.  You can also plant backups a week or two later and keep them in an isolated area.  Summer Squash and Cucumbers have a fairly short season.  Better to have two or even three short seasons in a row than to try to keep worn out vines going past their prime.


Problem: Squash Vine Borer and Cucumber Beetles
Pre-Emptive Solution: Plant later in the season.  A co-worker told me that his father taught him to never plant a cucumber plant before the first week of June.  That way when the Cucumber Beetles hatch in the spring, there are no yellow flowers to attract them.  This apparently works for Squash Vine Borer too.  I only see the SVB moths in May.  I don't seed zucchini until June.  By then the moths seem to have moved on.  And besides - good things come to those who wait


Problem: Bell Peppers not Ripening
Pre-Emptive Solution:  Plant them in large containers. Do yours take forever to ripen?  They do in my zone 5b.  If the plants are still going strong when frost is imminent, move the containers to the patio and/or cover them when frost threatens.  You can extend your season several weeks.


Problem: Stubby Carrots
Pre-Emptive Solution: Is your soil too hard and not tilled deeply enough to give you long, flawless carrots?  Containers and loose potting mix is the answer.  People who grow perfect carrots for fair exhibits actually use PVC tubes and sand.  THAT will give you a long straight carrot!


Problem: Curly Green Beans
Pre-Emptive Solution: Bush beans can be tricky.  For one thing, they aren't always bushy.  Know this in advance.  Some harbor secret ambitions to be pole beans.  And being broad leaved, they are susceptible to wilting in the afternoon heat.  These things combined mean that your bush beans may soon be sprawling all over the ground under their own weight and the abuse of the sun.  And all of this up and down business means that they will continually stub the bean ends into the ground.  The result is curly beans.  And I like straight beautiful beans.  And even worse, the tips touching the ground can lead to rot.  And then it's ruined. The way around this is to always plant your bush beans (or at least your new varieties until you know how they'll act) on pea trellis just in case they want to climb.  And keep them well watered.  Problem solved.


Problem: Cabbage Moths
Pre-Emptive Solution: Cover your crop.  Whether it is broccoli, cauliflower, cabbage, brussels sprouts or kale, your crop will be prettier and much more successful if you keep those little white butterflies out of it.  This means either covering it with a floating row cover or some kind of wire mesh.  Or both.  The wire above is just large enough to allow a moth through.  I know because I found one trapped in there.  But it will keep off 99% of them and discourage them from laying their eggs that turn into those little green worms you find in your broccoli.


Problem: Cold Soil Temperatures
Pre-Emptive Solution: Solarize your soil.  Many varieties require quite warm soil to germinate seeds.  In my case it's the Gotta Have It sweet corn.  If your soil is not warm enough you will have dismal germination rates.  Many people use black plastic, but if you can get your hands on some polycarbonate greenhouse panels, those things REALLY do the trick.  And they last longer than sheet plastic.  I don't know about you but I'm not real fond of folding up dirty, wet plastic.  It disintegrates after a couple of years anyway.


Problem: Losing fruit to insects, pests or fungus
Pre-Emptive Solution: Bagging Fruit.  I have learned to always bag my apples.  You don't have to bag them with plastic, you can bag them with paper bags, or mesh bags or even sections of pantyhose.  But the idea is to keep the bugs and the airborne disease and the deer noses off your apples.  Or any other round fruit you might be growing.  This make a HUGE difference in the appearance of my apple crop and so far has kept the deer and squirrels from eating them.


Problem: Bird Damaging Seedlings
Pre-Emptive Solution: Wire cloches.  I buy mine from Gardeners.com and I find them useful for several problems.  Over the winter they stay over my Primroses to keep the rabbits from nibbling them down before they bloom in early spring.  I also use them for patches of crocuses which the deer always seem to eat just before they bloom.  Then they get used for any tender transplants such as sunflowers, pumpkins, zucchini or even beans.  There is something about these particular seedlings that makes the crows just want to snip them off.  You can also use dollar store wire wastebaskets. I like the aesthetics of the cloches, but if I had a lot of plants to cover I would have no problem using the wastebaskets.  If you are worried about pests knocking them over, pin them to the soil with two Easy-Out Earth Staples and they won't be going anywhere.

So those are some of the techniques I use every year to avoid problems.  I'm always learning new ones.  Maybe some of these will be helpful to you.

Tuesday, June 19, 2018

The Collective Unconscious

This year I have joined several gardening groups on Facebook.  All day long I can look at photos of people's beautiful gardens and discuss the finer points of gardening.  On the other hand my Facebook feed is bombarded with an international array of pests and problems, to the point where I dream at night that I have tomato horn worms!

"Joe Gardener" has a Facebook page which attracts a lot of master gardeners 
with great set ups and a wealth of knowledge.
His was one of the gardens I used as inspiration as we planned our garden
I've also come to realize that there are a lot of people who jump feet first into gardening with absolutely no idea what they're doing.  They grab a used bucket or maybe an array of recycled containers, fill it with dirt and start putting in tomato plants.  Then they start asking about ideas to keep the rabbits, chipmunks, squirrels, deer and raccoons from destroying everything and for help identifying diseases.  Now that's not necessarily a problem, we all learn by doing but maybe buy a comprehensive garden reference book and flip through it once or twice?

The Big Book of Kitchen Gardens is a good start
Throughout the day I send instant messages to my co-worker with some of the really funny ones.  We both grew up out in the country and obviously take for granted a lot of farmer common sense that does not get distributed in the city.  For example, cow manure is good, don't water the garden EVERY day until it wilts from exhaustion and more importantly how to tell the difference between Indian strawberries and poison ivy!

Just so we're clear:  This is wild strawberry
and this is poison ivy
But besides seeing enough poor soil, blossom end rot and powdery mildew on a daily basis to give any gardener an extreme case of paranoia, I also pick up a lot of random useful information to stash away for future use.  Interesting facts like although tomato horn worms blend in with your tomato stems, they also glow under black light making them easy to hunt in the dark

Tomato Horn Worms under black light
Reading about everyone else's challenges day by day, and seeing all of the bad things that can happen, makes me very grateful for my well constructed, nearly pest free garden. I stop to reflect on what has made me successful as a gardener.  Certainly there is some inherited aptitude and collective gardening unconscious (in Jungian psychology the part of the unconscious mind that is derived from ancestral memory and experience and is common to all humankind, as distinct from the individual's unconscious)
There is upbringing since I learned to transplant seedlings about the same time I learned to write my name.  There is my tendency to be curious and read extensively about whatever subject interest me at the time.  There is the fact that I live out in the wide open rural countryside where pests have to travel a bit between gardens.  And I think a lot of it has to do with the structure and management of the garden itself.


Look at my garden and tell me what you don't see.  You don't see native grasses, "weeds", trees or shrubs up against the fence.  You don't see an untended field full of insects and critters.  You don't see other houses or gardens nearby.  What you do see is wide open gravel paths which discourage creepy crawlies and allow good airflow and sunlight to rule the garden, and you see a very sturdy fence.  I think a lot of critters walk by, glance in and think "parking lot".  That's one luxury of living on acreage in the country.  Lack of space is not a problem.

Of course the Facebook world is not solely populated by beginners.  There are a lot of accomplished gardeners there to help the newbies and to debate the minutia of gardening knowledge.  One such fellow posted on a couple of groups asking if he should mulch his vegetable garden and if so what material should he use?  After about an hour he announced that he had learned two different approaches to it.  "Absolutely NOT" and "Absolutely YES".

10 Proven Uses for Epsom Salt in the Garden
For every dozen people who swear that Epsom Salts are the key to green plants, there will be someone who can scientifically debunk the myth.  Companion planting - new age liberal hocus pocus.  Planting by the moon - archaic mumbo jumbo.  Compost tea - hogwash.  Pruning tomato suckers - why bother.  Eggshells, Coffee Grounds, Banana Peels - ineffectual

So what is the answer?  Just listen and learn and practice some good old fashioned trial and error.  And don't lose sleep over someone else's horn worms.

Thursday, May 18, 2017

Container Gardening - combination pots

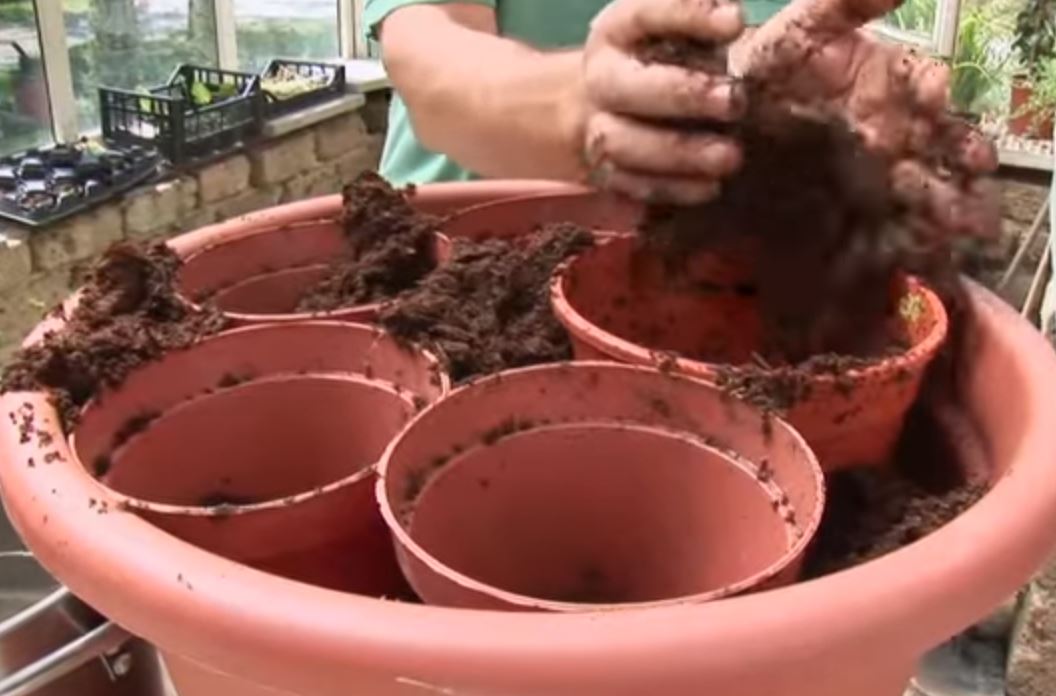
We interrupt this season's search for the perfect petunia for an absolutely brilliant tip on potting up combination pots.  I have three whiskey barrels and a couple other large containers to plant in my landscaping and it's not a process I've ever really enjoyed because of all the planning and placement and respacing and adding and subtracting of soil.  It always ends up being a bit of a messy business, especially if you are working with spreading plants that are mature and filling out.


  • Just take spare empty pots the size of the ones you are removing the plants from.  
  • Place them in the larger container the way you want them.  
  • Fill the potting soil around them and firm it up.  
  • Remove the small pots one by one and replace with the plant itself.
How easy is that?  Now I'm looking forward to potting up all those containers!