We put a lot of work (blood, sweat and tears) into making our place look tidy but the two car garage, eye sore that it was, had been totally ignored throughout it all. For fifteen years actually, since that's how long I've been here. When we sided the house many years ago, we bought enough siding to finish this garage, the big garage, the chicken coop and the garden shed, but the garage was in such awful bad shape that we knew before we sided it we were going to have to fix it up a lot. Or tear it down and start over. We couldn't decided.
Tear it down.fix it up.tear it up... Right up until last spring we couldn't decide. The big version of the project was to tear down the old garage and build a fancy new three car garage at a right angle to this one so you could pull straight in from the driveway approach instead of making the left turn into the garage. Pros: It would be big and beautiful and brandynew. Cons: It would probably dwarf the house up close like that, and it would definitely raise our taxes. And nobody likes that.

But this garage could not be left the way it was. To the best of our reckoning it is at least 65 and most likely 70 years old and highlights some rather suspect building methods. It was built out of 2x4s back when 2x4s were actually a true 2" by 4". And the outside was planked. So the actual materials were pretty good even if the studs weren't plumb or evenly spaced and a couple of the rafters were multiple pieces scabbed together. Until you got to the concrete work. Something definitely went wrong there. The back corner was crumbling and the entire structure was slowly sinking back into the soft woodsy area behind it. The back left corner was 8 inches lower than the front right corner. The floor was very cracked and a little heaved and the floor drains did no draining. Left to gravity and time, it would eventually have sat down on it's own.

If we wanted to save this building, my husband decided the only solution was to jack it up, pour a new foundation and floor, and rebuild whatever structure needed it. We found a crew crazy enough to try raising it and we spent a month or so tracking down and accumulating heavy old railroad jacks.

We stripped off the cedar shakes and removed all of the doors and windows. At this point, one evening, we found a hummingbird had flown in there and become confused trying to find her way out up through the rafters and we spent about 20 minutes persuading her to cling to a net which she finally did once she became too exhausted to try anything else. We carried the net over to the lilac tree and got several minutes of enjoying her up close before we encouraged her to try to fly off. Which she did.
The next step was to build a reinforcing structure inside with lift points and start jacking. My husband bought three farm jacks from Tractor Supply to lift the lean-to wall. The first jack failed right off the bat. It was rated at 3.5 tons and it didn't get anywhere near that. Instead, we used the front end loader of the tractor and returned the farm jacks. To their credit, TSC took back the failed jack too since we could prove that the tractor that lifted the wall was rated at less tonnage than the jack and it did the job just fine. The old RR jacks worked like a charm. They just don't make things like they used to. Including this garage....

Every wood block and cement block we could find went into supporting the lift structure. (Note the crumbling wall in the back left corner)
Closeup:

The Amish supply list didn't included any blocking. One wonders where they thought that was going to materialize from. Obviously there was some lack of thought. But luckily, we have a lot of stuff stashed around here.

Also on the lucky side is our stock pile of landscaping ties. Because the sloping base-wide shape of the concrete forms turned out to be out of the Amishman's range of engineering skills and when the concrete started to pump, the forms began to slump. And blow out in every direction. A hurry and scurry with the ties to brace the forms saved the day. I always wonder what the neighborhood thinks of our projects when we have 50 boulders strewed along the roadside, or a dozen RR ties propped up against the garage. There were two neighborhood "foremen" present when things began to go wrong and they cleared out in a hurry only returning days later when it appeared the coast was clear.

Now we had to wait for the concrete to cure before we set the building back down and jackhammered out the old floor. The new foundation it 12 inches higher than the old foundation raising the garage up so that rain water no longer runs through it. Which it used to. A nice stream under the door and out the back corner. Not to mention the river that always went through the lean-to from front to back.

For many weeks our driveway looked like a disaster zone.
Piles of gravel. Piles of lumber. Piles of scrap headed to the burn pile.

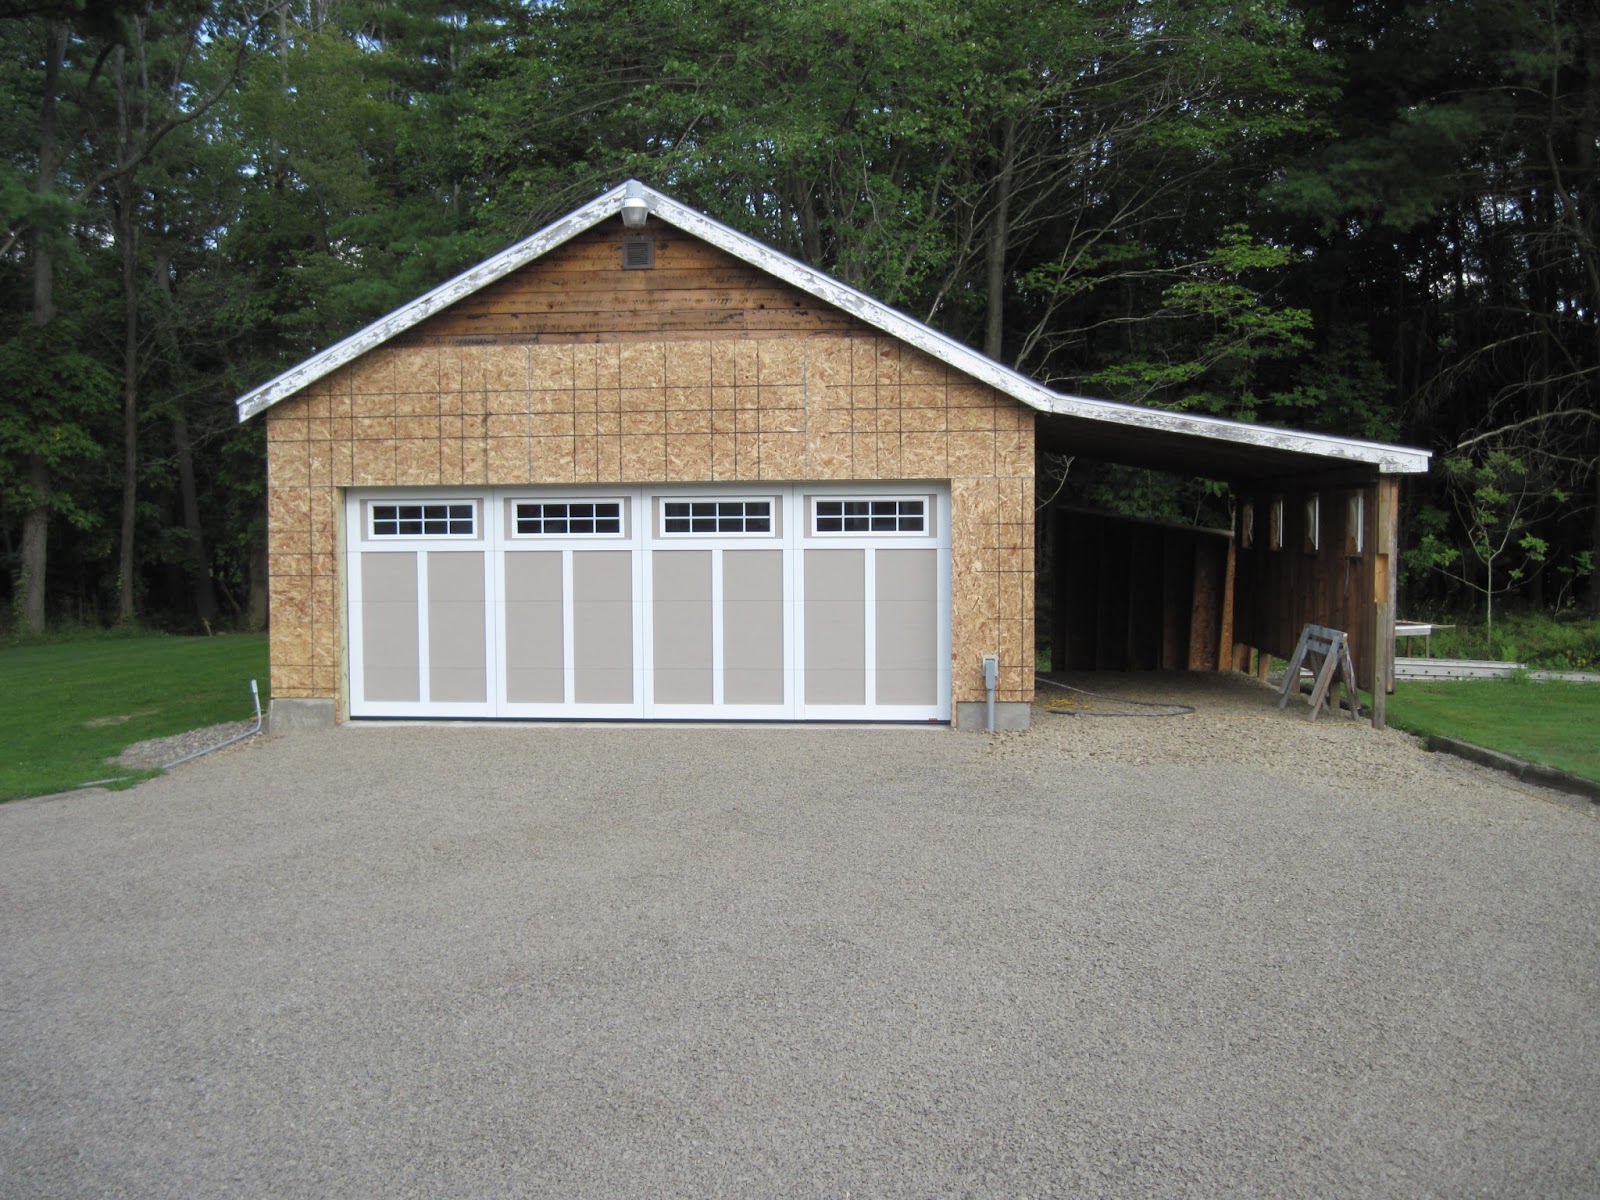
One design change we made was to get rid of the two small, eight foot doors and replace them with a custom 18 foot door. The borer bees and ants had made powder out of the door headers. We removed all the bad lumber, burned it, and rebuilt the wall. The outer walls were reinforced with OSB board to stiffen them and provide a better nailing surface than the old planks. The garage is now square, plumb, level and no longer sinking.
The soil surface under the old floor turned out to be pretty bad. Unstable, full of voids and not good gravel or any other useful material. In fact, a family member told us later that the garage site was where the grandparents had the pig-sty. Which makes a lot of sense. The previous owners just filled in the pig yard with whatever was handy and capped it with a thin layer of concrete.
So at this point we had a pretty stable garage and Tim was pooped.
Every morning all summer he came out the door to face this project. It was time for a break.
We just needed to make the structure weather proof for the winter. And clean up around here so it didn't look like a construction zone!

All the materials for the floor and end walls were moved
out of the driveway and stored under the shed.

The house wrap was applied, and now we were ready for winter intermission.

So that is how the garage looked all winter and through this spring.
All that was left to do ("all that was left" - that makes it sound so simple) was put a floor in the lean-to (under the existing wall - a pretty involved engineering feat) and put the siding on. The siding is just the icing on the cake, but if it doesn't look nice then all the hard work you put in to get here is sort of pointless. You have to get this part right. And hopefully if you put in a lot of hard work the siding will go smoothly.
Unless, of course, the right wall is higher than the left wall and the center of the roof is not over the center of the wall. Remember: "rather suspect building methods..."
Also, all of the siding had been stored for over 10 years. First in the lean-to and then out in the driveway under tarps. We did our best to keep rodents and water out of it, but a lot of it still had to be washed because the disintegrating cardboard boxes had stained it. Washed piece by piece. Easier to do on the ground than on the wall. Building the floor and siding the garage took as long as raising it did last year. Of course this was done by one person as opposed to several crews of helpers.
One more look at the before:

And now the after.

No comments:
Post a Comment