Tuesday, August 17, 2010

Fresh Garden Salsa


This is one of my "signature" dishes. Whenever we go to a "dish to pass" party in the summer, I put together one of my fresh garden salsas. The best part of this is you can usually find all the ingredients in the garden.

You will need:
2-3 ears of sweet corn, cooked and off the cob
1 tomato
1 medium onion
2 bell peppers ( I like to use green and orange, the red color is taken care of by the tomato)
1 bottle of Italian dressing (I use one packet mix of Good Seasons)
2-3 tablesppons of lime juice to taste

Optional:
1 can of black beans rinsed
2 tablespoons of chopped cilantro

Chill one hour. Serve with tortilla chips (I use "Scoops" chips)


Monday, August 16, 2010

Too Many Tomatoes

I finally achieved "too many tomatoes" status this past weekend. Even after canning a batch, choosing one for lunch, and using them liberally in salads for days, I still had more tomatoes than I could eat all at once. I was so excited that I finally had a good assortment to take to my neighbor and fellow tomato nut Sheryl. Sheryl doesn't garden, but she loves tomatoes. Last summer I promised that this year, when the garden was in full swing, I would bring her a sampling. Sunday I was able to put together a little gift basket and a handwritten list of what they were. This little basket of tomatoes looks like a wonderful present to me. I hope she enjoyed them.


Pink~ Barlow Jap (PaPaw's tomato)
Green ~ Ananas Noire (One of my favorites)
Golden ~ Dr. Wyche (new to me this year, and a great yellow variety that I will grow again)
Yellow ~ Super Snow White
Green shouldered cherry ~ Black Cherry (new to me this year and just beginning to ripen)
And of course a sprinkling of the Sun Gold cherries.

Sunday, August 15, 2010

Yes You Can ~ Tomatoes

What do you do with a whole mess of unwanted tomatoes? When I say "unwanted" what I mean is these are a varieties that Mom and I bought on a whim, and they are not the first ones we reach for when we're making sandwiches or salads. The main harvest of the paste tomatoes for sauce is still a week or so away, and the "unwanted tomatoes are piling up. So, in the jar they go.


I've been through the canning routine before. Several times. And I am still operating on a small scale. I've decided one thing from my experience this weekend. This is a project that needs two people. Or 4 hands. Or something more. I'll just share a few of my pit falls with you and perhaps you can learn from my experience, or share some of your owns to help me get better organised.


The first thing I do is turn on the central air. Because, let's face it... any self respecting mid-century farm wife, in my situation, had she had the opportunity, would have turned on the central air. And I have it, so canning day is one of the top 3 reasons to use it. Then, I empty my kitchen. I don't mean "clear a work space". I mean empty my kitchen. Saturday is the day I clean, and when I clean the kitchen, I really do take everything save the appliances right out. Ask my husband. For this photo, I left the pictures on the wall, and the towels on the stove, but by the time I've cleaned up, those will be gone too! Because, after two hours of canning tomatoes, my kitchen will need to be cleaned. I even take up the braided rug. This is essential.... I already learned that lesson!


Next I assemble my canning paraphernalia, get out my trusty Ball Blue Book and station it on the dining room table where I can get to it for a referral if I feel I'm missing something. (one time I forgot to add lemon juice to increase the acidity, but the people on iDig forum assured me with heirlooms it wasn't a necessary step, and it turned out OK... as in, no one died from botulism)


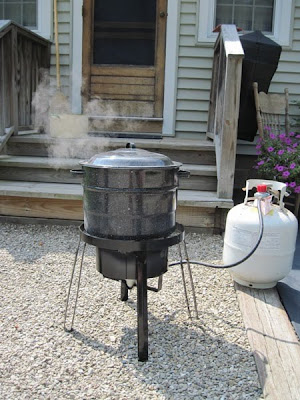
Then I ask my husband to set up the turkey fryer outside the kitchen porch, and I'm ready to go.


My crew assumes their positions. Mitey Mite hunkers down in the "kitty bomb shelter". She weathers all maelstroms in the small, central room that is the linen closet. If she even thinks she hears a rumble of thunder, she heads straight in there, then cries and wonders why no one else has gone to the safe room in the center of the house. Kitchen cleaning, and canning day are a double whammy.


Tim takes the high road and heads out side to do a little "weeding" along the edge of the apple orchard. (No, I don't know how he got it cut and on the bucket with not a leaf in the lawn, all by himself... I was setting up canning.)


I assemble every large pot I own on the stove top, and start boiling about 10 gallons of water. One for the jars. One for scalding the tomatoes. One for the lids. One for good measure. I wash and core one strainer full of tomatoes. The basket turned out to hold two strainers full. The six jars turned out to hold two strainers full plus... Oh gosh, I'm out of tomatoes... plus a batch of largish "cherry tomatoes" that are good for nothing else... still not enough... plus the ripest of the Costoluto Genovese I'm saving for sauce... I dash around the house rounding up likely looking tomatoes and plunking them in the boiling water. A couple of jars end up a little light anyway, and I top them off with boiling water and remember the lemon juice this time.


This is where it becomes obvious that emptying the kitchen and scattering trivets everywhere was a wise move. I juggle stock pots full of boiling water pouring, splashing and plopping tomatoes everywhere. Sometimes I carry scalded tomatoes one at a time from the stove to the sink with tongs, squish tomatoes into jars and fish out stray pieces of skin. Tomato seeds are stuck to every surface. I get mixed up and put the tomato in the slop jar and the skin in the canning jar. I wish for an extra set of hands to core tomatoes while I stuff jars. My beloved graniteware is again pressed into service. It lends a sense of timelessness to my tomato struggle.


This time I've given the turkey fryer plenty of time to get to a rolling boil. I check it before I'm ready to put the jars in and it's boiled out a good portion of the water. I grab the "for good measure" pot and fill the canner back up, refilling and replacing the pot on the stove without ever turning off the burner. Repeated trips through the screen door lets in a blue fly and I wind up with one flip-flop on and one missing.

The jars go in the bath precisely on schedule. Eyebrows raised... how? Within minutes, the canning bath discolors. Uh-oh, I have a crack. I hope it's just one and I hope I'll be able to figure out where it is without lifting the wrong jar and having it explode tomato juice all over everything. I start the clock and head back inside to start my "real job" which is cleaning the house. Tomatoes have to simmer for 45 minutes, plus another 5 for every thousand feet above sea level. I round up and figure 55 minutes to an hour is good.


I check the fryer every ten minutes to make sure it's still burning and steaming. I trust Tim has given me a full propane tank, but I know a well placed splash can put it out. After half an hour I bring a pot of boiling water out to top it off. Ten minutes later I stick an ear out in the porch, and something doesn't sound right. The fire has gone out, but the gas is still flowing. I relight the flame and note the time. It takes 5 minutes to get a hard boil back up. I add 15 to my finish time.


At 4:10pm I turn off the flame, and pull the wire basket up to rest on the lip and cool the jars a bit. Tim brings them in for me and sets them on the stove top. I've put down a paper towel hoping to pinpoint which jar is cracked, but it's immediately obvious.


So THAT'S what happens when you dilly dally and don't keep your jars hot while filling.....The other 5 are fine.


I scurry about putting the house back together and giving the rest of it a once over with the vacuum and a swiffer duster. Tim packs a cooler of beer while I run through the shower, and we head to the neighbors to unwind. Bob and Trish, fellow gardeners, have invited us over to have a little bon fire to celebrate the harvest. I'm always eager to see what they're up to. Trish is an excellent cook, gardener and home maker and she can out do me any day of the week and twice on Sundays.


...And she's done it again. I was glad I brought my camera, but I didn't linger too long over my canning woes when I saw what they had been up to today.........


Looks like it was a banner year down at the Blanchards. But Trish understands what my day has been like. My tally for the day is 5 quarts of tomatoes. And theirs... I can't even begin to add up the poundage in my head! Oh well, we all deserve a beer anyway.

Tuesday, August 10, 2010

What's Growing ~ Super Snow White Tomato


The Super Snow White is a small, mid-season, heirloom tomato. It's heralded as a sweet tomato, but to my taste it's rather bland. That doesn't mean that it's useless! I love this little tomato, and I really missed it last year when I didn't have a garden. I did grow out a plant and give it to my mother, so I had the chance to enjoy some. It is fairly non-acidic as most yellow or orange tomatoes are, but it's nearly white, ripening to a uniform yellow. There is no mealiness to it's texture which is juicy yet firm like a good slicing tomato.
What I love about the SSW is mostly it's appearance. It can be found on my counter as still life all summer long. It's a 2 oz tomato about the size of a small chicken egg or golf ball, but some of them get a bit larger. The plants are consistent producers, and you can bet on 3-5 ripe fruit from each plant each day. Which makes it a staple in my salads all season long.

I mix it with my favorite cherry, the Sun Gold. The Sun Gold's intense sweetness and bright green seed gel are perfect on top of the neutral Snow White. I sprinkle some of my favorite Italian dressing and I have the perfect summer jewel tomato salad.

Monday, August 9, 2010

The Perfect Tomato Sandwich


Now I'm not going to tell you what THE perfect tomato sandwich is, because that, my friends, is a highly personal subject. What might be MY perfect sandwich might not be anywhere near what YOUR perfect sandwich is.

This person's sandwich...

Isn't anything like this person's sandwich.


Or this sandwich....


The perfect tomato sandwich can be toasted or untoasted, plain or with meat, dressed up, or dressed down. There are only two tips I will give you. The tomato is very important. You need a home grown or local heirloom variety tomato, not one of those come-from-far-away tomatoes, and not a hybrid. And for efficiencies sake, it should be sandwich sized. You can even stack two thin slices of different varieties or colors. And secondly, the bread, dressing and seasoning does make up the other half, so they can make or break a sandwich.

I've tried various combinations. Starting with a BLT, I've discarded the useless lettuce, and enjoyed thick hot slices of home grown bacon. (Save the grease, you'll need it in the fall for fried green tomatoes.) I've wavered back and forth between Miracle Whip and Mayonnaise. I've tried multi-grain, sourdough and good ole Italian breads. And I've done a fair amount of experimentation with different varieties of heirloom tomatoes. I've ruined tee shirts when juice skidded down my chin, and mooshed some tomatoes when a proper knife could not be found. I've eaten tomato sandwiches for over 30 years, and here is what I've found.

Start with some fresh Italian bread, either sliced or in a peasant loaf. Choose a vine ripened tomato of your favorite variety. My favorites are #1 my PaPaw's Barlow Jap #2 Ananas Noir (Black Pineapple) #3 Pineapple and #4 Black Krim which has a unique smokey flavor that blends marvelously with bacon. Slice a sandwich sized slice right out of the middle, using a serrated knife so you don't crush the tomato. There's nothing I hate worse than having to piece together the tomato to fit the bread and loosing a chunk towards the end. Spread a light layer of Hellman's Mayonnaise on each slice, sprinkle some seasoning on, and assemble your sandwich, slicing it down the middle for easy handling.

Some people season their sandwiches with just salt and pepper. Some prefer fancy seasoned sea salt. Others add fresh herbs, particularly basil. My personal favorite is Borsari seasoned salt. This is a sea salt with fresh garlic and herbs. It's made by a lifelong friend of mine whose grandmother brought the recipe with her from Emilia, Italy, and passed it down to him. I've enjoyed this salt in many of his dishes over the years, and have recently learned to cook with it myself. I also add a sprinkle of dried oregano to suit my taste.

Most slicing sized tomatoes will yield two sandwiches. Since refrigeration breaks down their sugar content and makes them taste awful, I've found that a sliced tomato will keep just fine for a day at room temperature if you put it sliced side down on a glass cutting board or dish. I generally save the shoulders for supper, and cube them up for a salad.

So there you have it. My idea of the perfect tomato sandwich, shown here with the first Ananas Noir of the season. Due to the hot summer, and the even hotter micro-climate of my garden, tomato sandwich season has started a full 28 days early! I've always marveled at the fact that I will work and wait and worry for four and a half months from the planting of the first seed until the slicing of the first tomato. This year was only three and a half months! But that's still a short estimate. I wait from the first frost in November, until the first juicy, warm, ripe tomato in August. Nine long months for that first perfect tomato sandwich.

Wednesday, August 4, 2010

The Architecture of Companion Planting

It probably doesn't come as a surprise to you, but I'm a planner. I have spreadsheets and lists, and computer files for everything. My goal for the garden, is to have each bed planned to make the best use of companion planting, crop rotation and successive planting to maximise the garden output. Since last year was a non-garden year, I spent a good deal of time researching companion planting, and figuring out what was most important to grow. Throw in a bit of multi-generational farmer collective unconscious, and I have a pretty efficient plan. I was very happy with how each of my beds turned out, and with a few minor adjustments, I'm looking forward to an even more efficient layout next year.

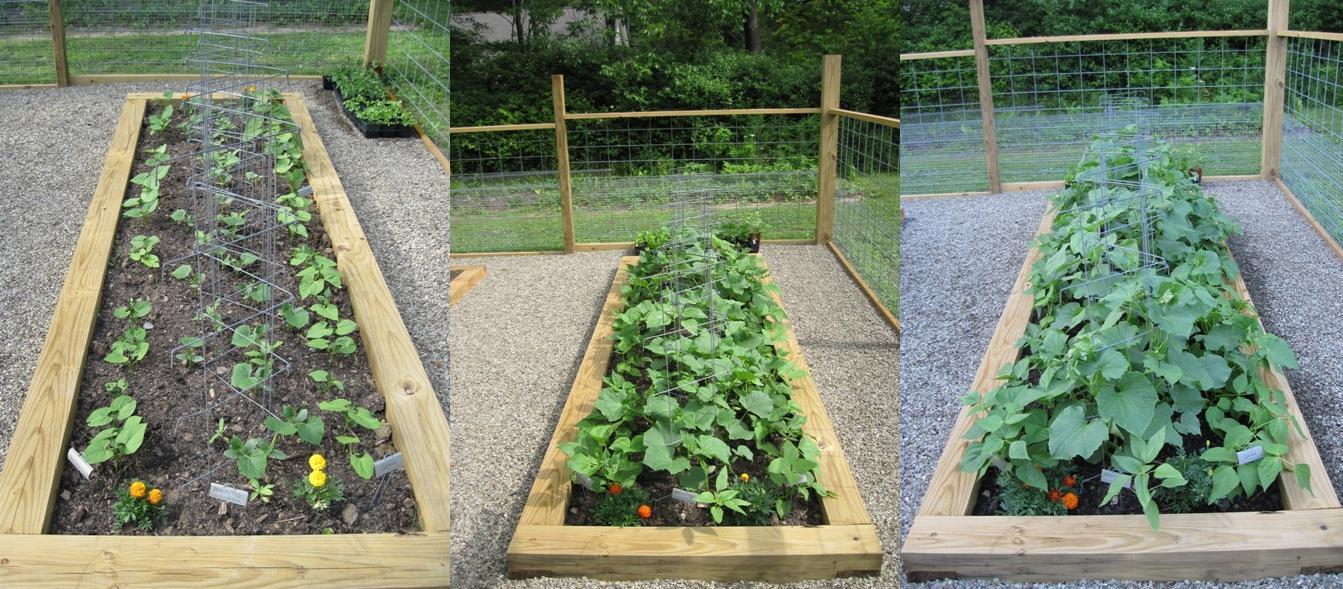
The Cucumber/Bean/Sunflower bed is my favorite. Next year I'm going to go ahead and add a little Nasturtium to it. I started with a line of "pea fence" down the middle (I've had these for years, and they work great and store easily) with cucumbers every 8 inches or so, and sunflowers every foot. Although cucumbers are not aggressive climbers, they are climbing the sunflowers quite well. I've noted that cukes always seem to grow primarily east, probably seeking the morning sun, and not ambitious enough to follow her in her climb as the sunflowers will, turning their faces first east, then west with the sunset. (click on any photo for an enlarged view)


Then down each side I put a row of bush beans. I always wish that the plants would produce when they are mid-sized and still tidy, but by August, they resemble a rain forest, and vines are slowly creeping down the walks littering with cucumbers as they grow. Next year I will give the sunflowers and beans a head start, planting them mid-May, two to three weeks ahead of the cucumbers. At this point, you can't really distinguish bush from vine, but the beans are in there producing very well, ejoying the draw of the abundant cucumber flowers to attract the pollinators!


The sunflowers are mainly for interest. My favorite seeds are Parks Large Flowered Mix. The bumble bees enjoy them most, and I rarely have the heart to cut them and bring them inside, although, that is always the plan. Having them planted down the middle with the pea fence makes it easy to tie them up and prevent the cucumbers or the rains from pulling them over into a jumbled mess.
Another successful plan was the Summer Squash/Cucumber bed. This was actually the second succession planting of both the summer squash, and the cucumbers extending the season by several weeks. In this bed, the cucumbers are planted on a pea fence down the far side, and the squash are centered down the bed. Everyone leans east, and I left plenty of room to grow in that direction. I planted Borage from seed between each squash plant, timing it just right so the squash are supporting the Borage and keeping the heavy flower heads from leaning like the other bed where I used Borage transplants.


We've been enjoying a nice crop of our favorite cucumber Marketmore. Back in 2007, I was picking a dozen every two days, which was a little too much! This year has been just right with about two a day, and the neighbor's excess for pickling.

The pickles are great, by the way. Very crisp making the overnight liming very much worth while. Even the pickled yellow zuchini turned out good. They taste basically like normal Bread and Butter pickles, with a subtle undertone of squash.

Sunday, August 1, 2010

Yes You Can ~ Bread and Butter Pickles

Since I have a fairly large (and expensive) garden, and I'm all about eating locally and being self sufficient, it is inevitable that I will have to can something. So far, my repertoire includes tomatoes and sweet pickles. I made a batch of sweet pickles back in 2007. We still have two jars in the cupboard. But Tim insisted that this is a pickle year.

The neighbor, Shelly, made dill pickles a couple of weeks ago. Yesterday they pulled their spent cucumber vines, accumulating about 18 pounds of cucumbers. Shelly eyed the pile with a marked lack of enthusiasm. "Look Shell'. More cucumbers! Yay!" I could tell Shelly was not up for another round of pickling. She was pickled out. " Tell, you what, in good neighborly fashion, I'll make these into sweet pickles, and we'll swap sweet for dill." The cucumbers were handed (perhaps shoved?) in my direction. The deal was done. So today was sweet pickle day!


I have collected a few Ball Blue Books from between the wars. They are very informational, full of recipes and advice (it would have never occurred to me to pickle walnuts), but mostly I love the illustrations. See how the steam curls wistfully behind her? And she's smiling! This must be FUN.


The 1916 recipe for sweet gerkins begins... "Scrub two hundred cucumbers with a small brush, put them into a stone jar, and cover them".... wait... did they say TWO HUNDRED? That must be one heck of a stone jar! Actually, I do have a stone "jar" (large CROCK) big enough to hold two hundred small cucumbers. But just for kicks, lets see what the spice packet I bought at WalMart says. 15 - 17 pounds. Good, that's what I have. 15-17 pounds of misfit cucumbers.


Now this is where my collecting comes in handy again. You don't want pickling lime or boiling vinegar in your aluminum pans. So, every large lidded piece of graniteware I have is pressed into service. Most of the sliced cukes fit in the large stock pot.


The rest... well the rest of them ended up in a slop pot full of lime water. I guess collecting pieces with their original label renders them useless for canning.


I like to use either Pickle Crisp or Pickling Lime to ensure that my pickles are crisp. If I were using actual pickling cucumbers, or small hard ones, I might skip this step. But when you're using a hodge podge of regular old burpless slicing cukes... better safe than sorry. I'm a little low on Pickle Crisp (hard to find these days) which can be added to the jars before they're processed, so instead I soaked the cukes in lime over night.


Pickling and canning is pretty simple in theory. But, it's a strategic nightmare. How do you get 10-12 quart jars hot, keep them hot, get the lids hot, cook your brine AND have burner left for processing? Not possible. I started with the pint jars anyway. They're easier to find homes for, and fit in the fridge better. I don't think I ever need a quart of pickles at one time anyway. Here I have 2 pots of sterile jars, the graniteware full of brine, and tucked in behind, a small sauce pot for the lids. The canning bath is out on the driveway on the turkey fryer! Tim is manning the fryer. He has a drink in hand, his CD player, and a lawn chair.


And so the fun begins. Or in other words: Havoc ensues.

Because you can easily follow the canning instructions in whatever book or spice packet you choose, I'll just give you a couple of helpful hints.

  • A watched pot never boils. 4 of them take 4 times as long.
  • Keep all boiling water in case you need to add to the canning bath.
  • Keep a sauce pan at the turkey fryer in case you need to bail some out when switching from pints to quarts.
  • Rubber dish gloves give adequate protection to grab most boiling objects for a moment.
  • Keep stuffing, more slices WILL fit in that jar.
  • You will run out of brine before you run out of slices, but prepare a few extra jars, lids and rings just in case. (since my cukes were such a hodge podge I sorted them as I sliced and pickled the most likely suspects first. Leaving the large {possibly bitter} seedy portions for scrap.)


For the next hour I put the camera safely out of harms way. I cheerfully stuffed and simmered and bailed and added water. Water did boil. Not much mess was made. Tim hovered on the edge asking how much longer. After an hour and a half he became impatient. We had a lively yet good natured debate over whose idea this was (his) and he declared himself cured of pickle making forever.

I waited with bated breath for each of the lids to pop telling me that this was not a colossal waste of time. I even pickled a couple of jars of yellow zucchini as an experiment. Because, Lord knows, we always need another use for zucchini.


And it all turned out perfect. Perhaps not picture perfect, but I'm still smiling.